Overview
My team and I were tasked with enhancing a basic command line addressbook for our Software Engineering project. We decided to morph the project into a image editor.
FomoFoto is a robust yet simple image-editing tool. Users interact with the application through worded commands from their keyboard, and receive visual feedback from it through the displayed image on the application.
Unlike other heavy image editors, FomoFoto has a very gentle learning curve as it abstracts out clutter by providing the more essential features (complex editing can still be done with special commands). The features and implementations are well documented in guides for users and developers respectively.
In addition, FomoFoto is well maintained with high reliability and code quality as it is covered by rigorous tests and checks.
Summary of contributions
This section provides a summary of my coding, documentation and other contributions to FomoFoto, our team project.
-
Major enhancement 1: added the ability to undo/redo transformations on an image
-
What it does: allows the user to undo previous transformations one at a time. Preceding undone transformations can be reversed by using the redo command.
-
Justification: This feature improves the product significantly because a user can make mistakes by applying incorrect transformations and the app should provide a convenient way to rectify them.
-
Highlights: Transformation history is stored as a list of commands so it takes up minimal space on the user’s PC.
-
-
Major enhancement 2: added the ability to export images to the user’s PC
-
What it does: allows the user to export an image in the album to a specified directory.
-
Justification: This feature improves the product significantly because the user can save his images outside of the application.
-
-
Code contributed:
-
Other contributions:
Contributions to the User Guide
Given below are sections I contributed to the User Guide. They showcase my ability to write documentation targeting end-users. |
Undo Edit Steps : undo
Goes back to the previous state of the image.
Format: undo
|
Undoable commands: those commands that modify the image ( |
Redo Edit Steps : redo
Returns to a previously undone state.
Format: redo
|
Redoable commands: those commands that modify the image ( |
Examples:
-
rotate 180
brightness
undo(reverses thebrightnesscommand)
redo(runsbrightnessagain) -
contrast 0.3
crop 2 3 500 500
undo(reverses thecrop 2 3 500 500command
undo(reverses thecontrast 0.3)
redo(runscontrast 0.3command again)
redo(runscrop 2 3 500 500command again)
Upcoming Features (in v2.0)
Layer
Format: layer add (layer name) → Creates a new layer for the user to work on.
Example:
-
layer add BW-layeradds a new layer with name BW-layer.
Format: layer select (layer name) → Selects the layer the user wants to work on.
Example:
-
layer select BW-layerselects the BW-layer.
Format: layer delete (layer name) → deletes the layer with input name.
Example:
-
layer delete (BW-layer)→ deletes the BW-layer
This command is not undo-able and transformations on each layer do not affect other layers.
Ruler
Format: ruler [ON|OFF] → Toggles a ruler that surrounds the displayed image. This will help you in estimating the number of pixels to move when using crop or resizing objects.
Contributions to the Developer Guide
Given below are sections I contributed to the Developer Guide. They showcase my ability to write technical documentation and the technical depth of my contributions to the project. |
Undo/Redo feature
Current Implementation
The undo/redo mechanism is facilitated by Image. It contains a list of commands applied to the current image. Additionally, it implements the following operations:
-
Image#addHistory()— Saves the current edit command into commandHistory list and increments index. -
Image#setUndo()— Decreases index by 1. -
Image#setRedo()— Increases index by 1. -
Image#getHistory()— Returns commandHistory as List. -
Image#getSubHistory()— Returns commandHistory sublist using index to track which commands should be included. -
Image#canUndo()— Returns true if index > 0. -
Image#canRedo()— Returns true if index < CommandHistory.size().
These operations are exposed in the CurrentEdit interface as CurrentEdit#addCommand(), CurrentEdit#setUndoTemp(), CurrentEdit#setRedoTemp(), CurrentEdit#getHistoryTemp(), CurrentEdit#getSubHistoryTemp(), CurrentEdit#canUndoTemp() and CurrentEdit#canRedoTemp() respectively.
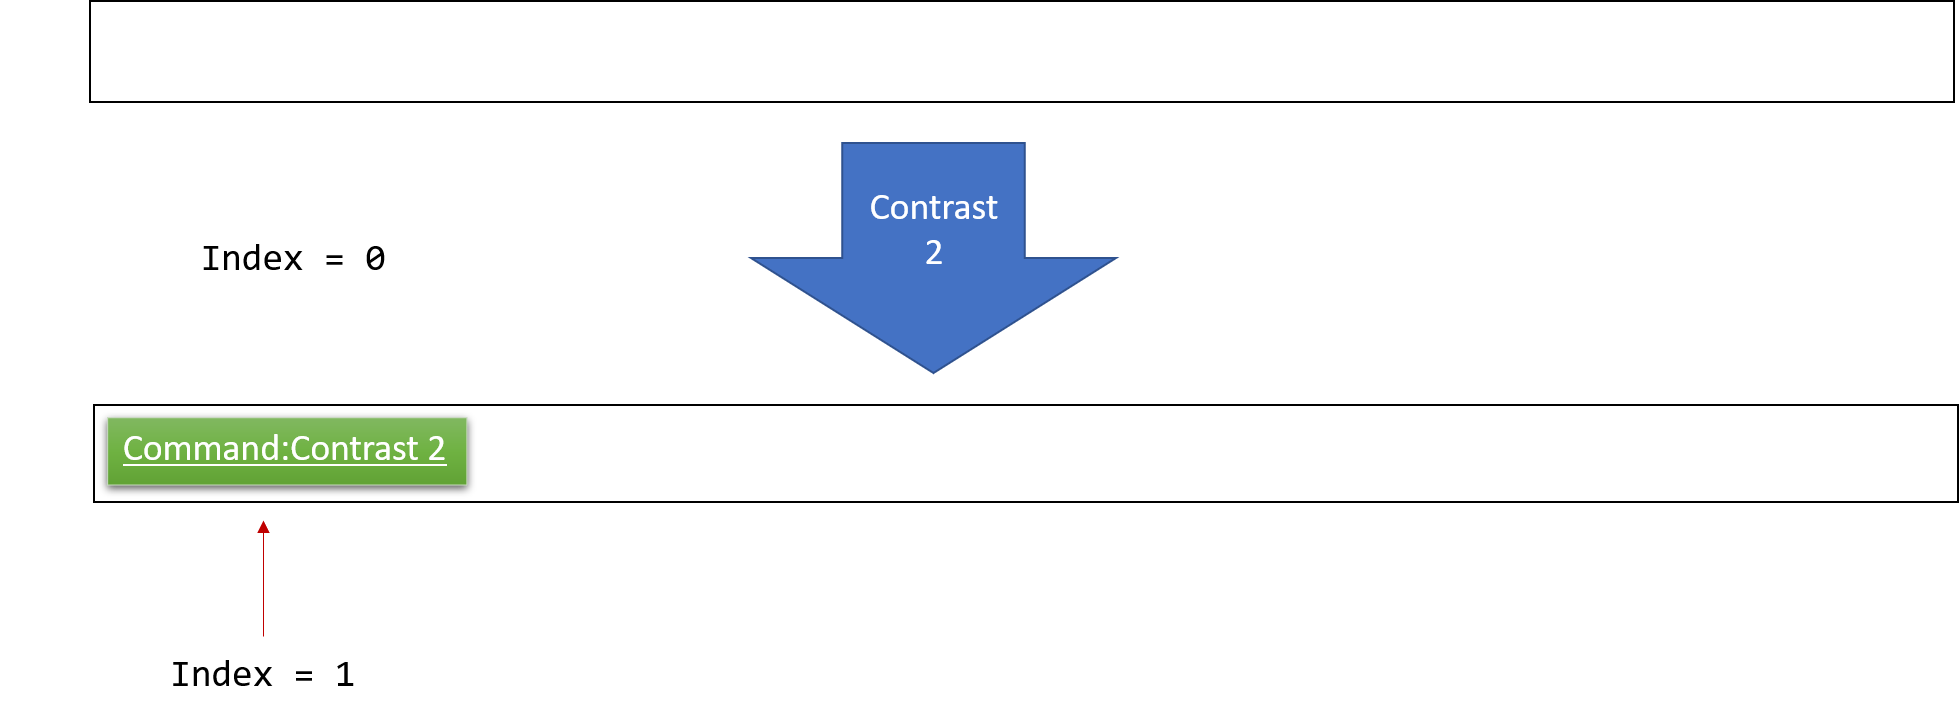
Given below is an example usage scenario and how the undo/redo mechanism behaves at each step.
Step 1. The user opens an image. The Image will be initialized with an empty commandHistory List.

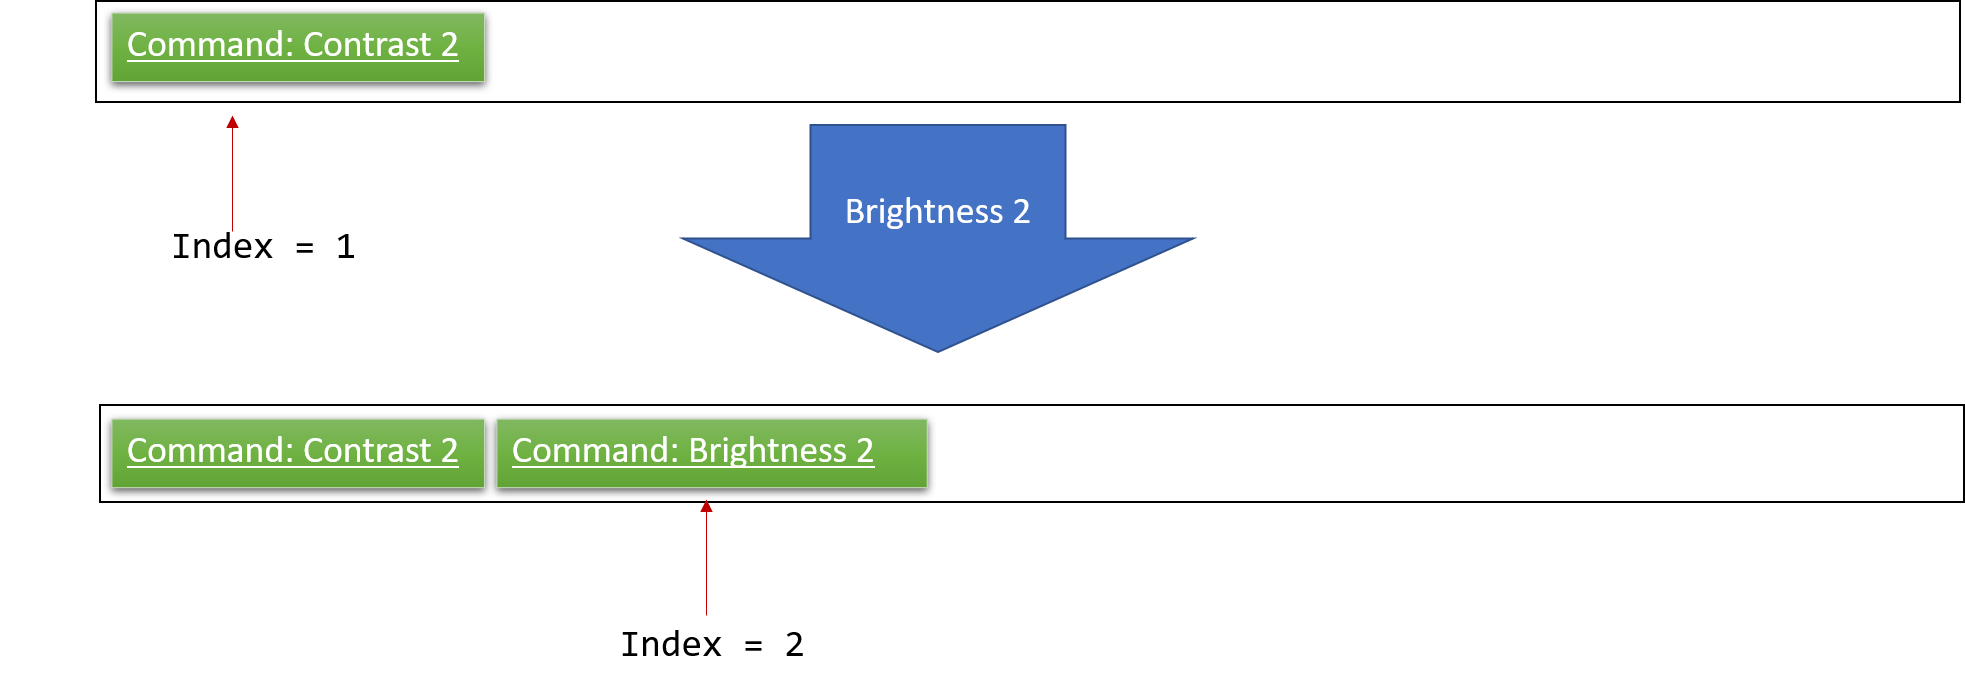
Step 2. The user executes a series of transformations on the image. These transformations are stored in the commandHistory list and for each transformation stored, the index is incremented by 1 to point to that transformation.
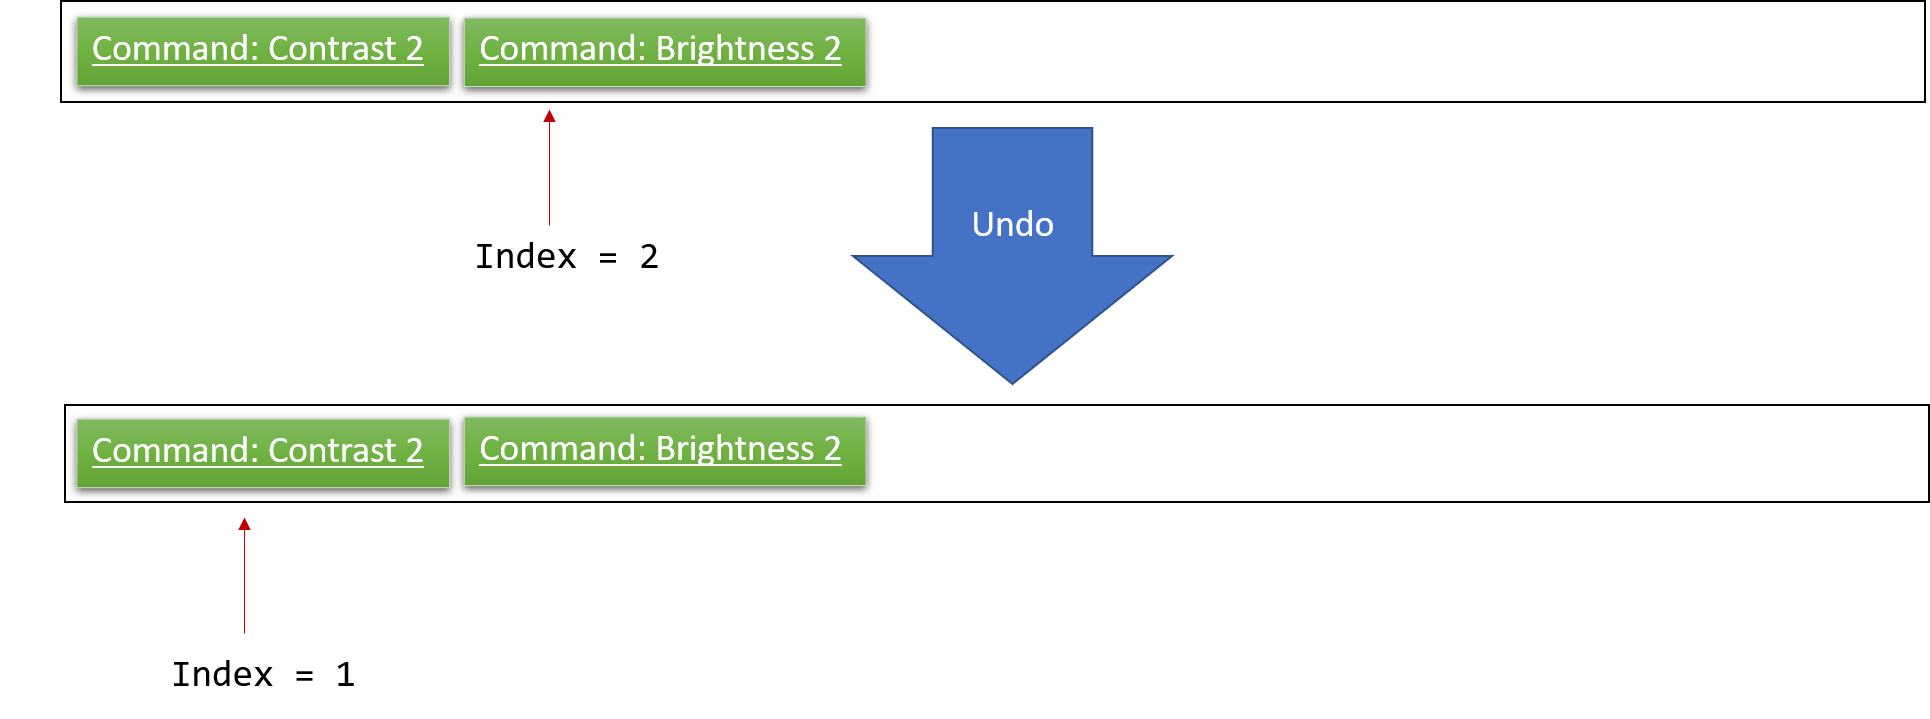
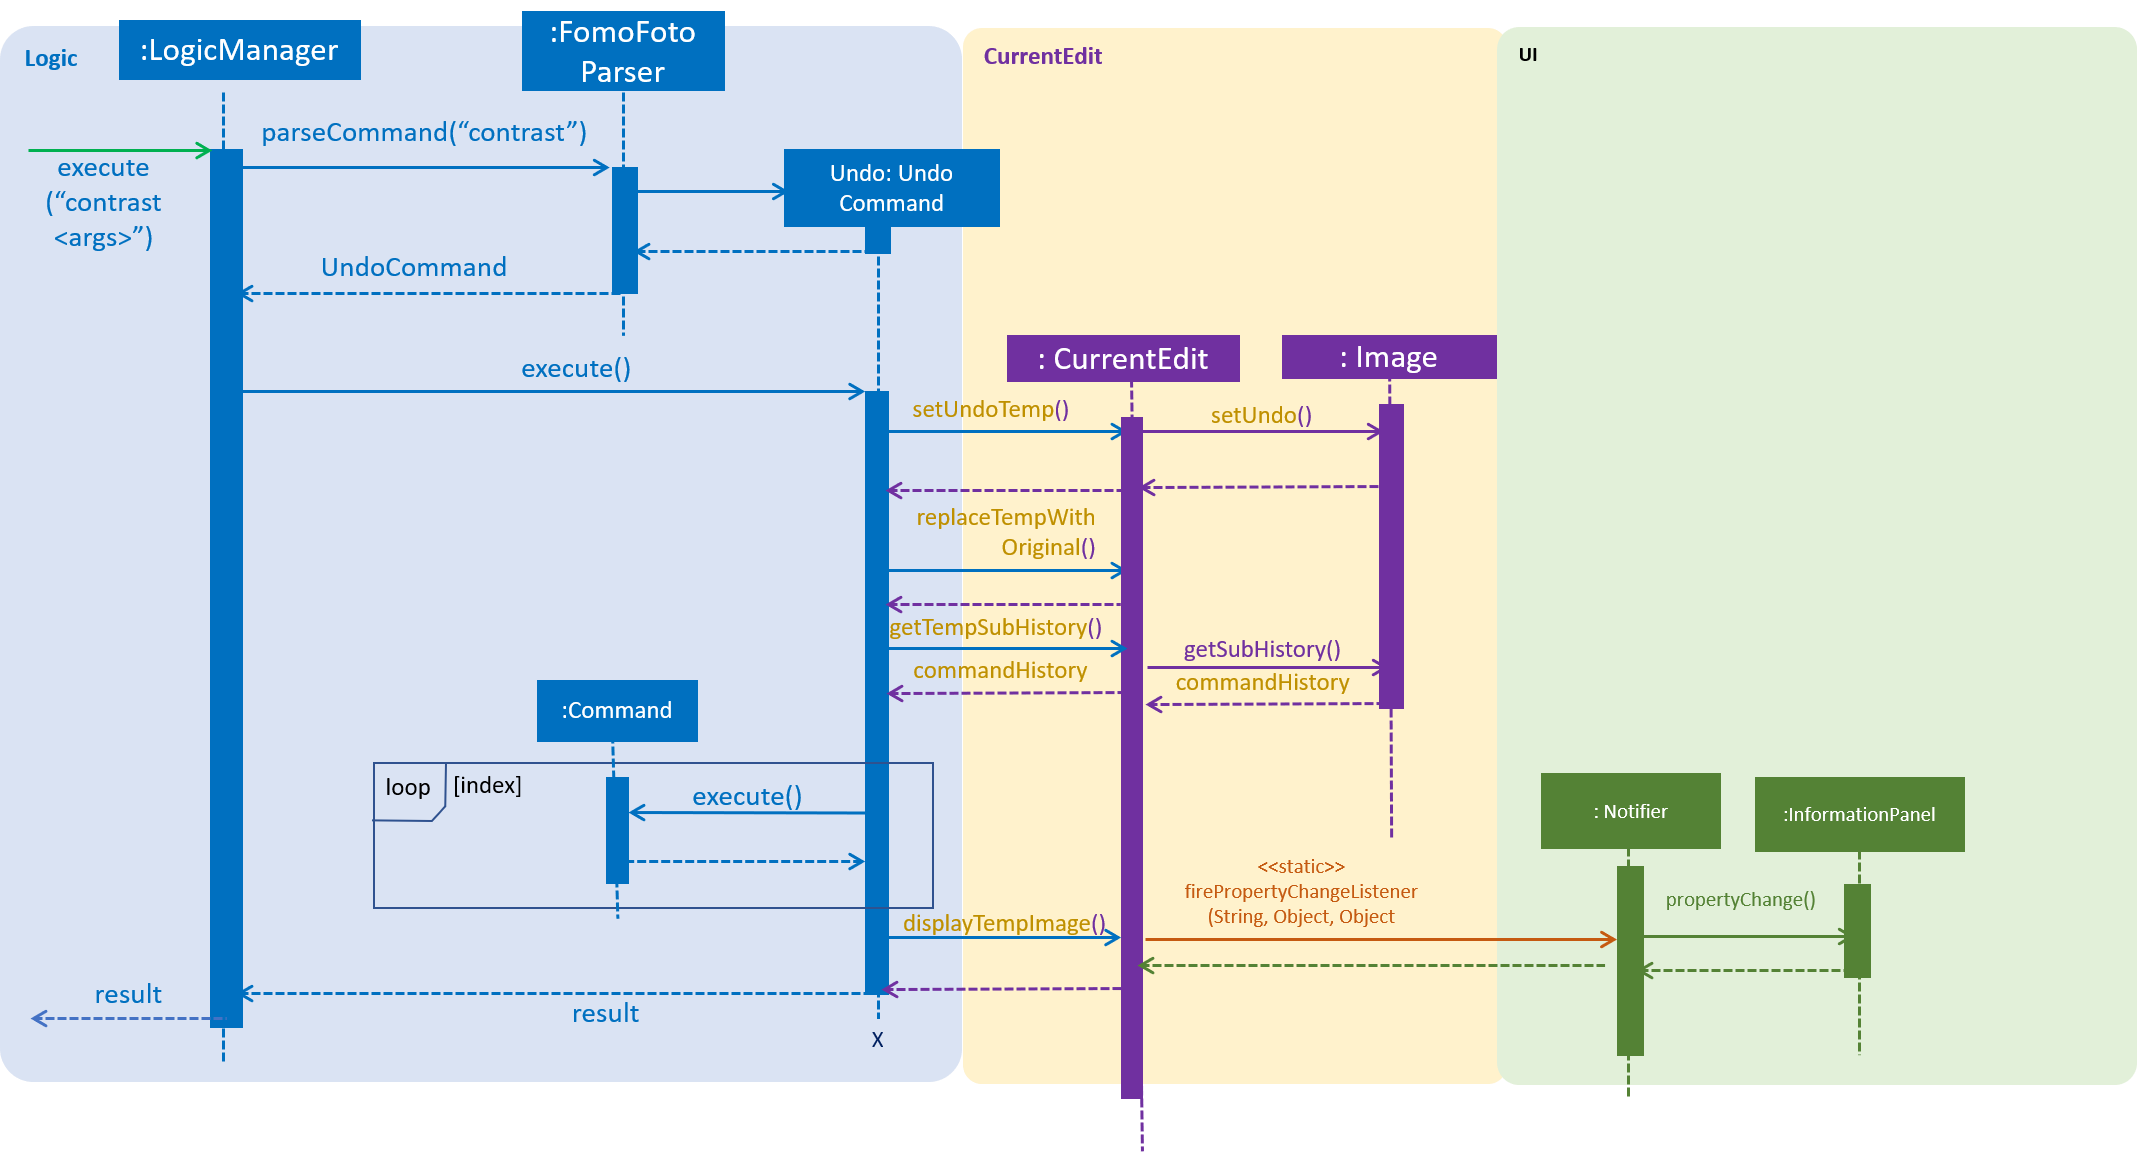
Step 3. The user wants to undo the previous transformation by using the undo command. It will call CurrentEdit#replaceTempWithOriginal() which will replace the edited image in temp folder with the original image. It will then call CurrentEdit#setUndoTemp() to set the index in tempImage to the required index and retrieve the list with CurrentEdit#getHistoryTemp(). Using the list, it will apply the commands onto the original image until it reaches the command just before the set index.
| If a command fails its execution, it will return the image before undo was called and produce an error message. |
Step 4. After executing Undo, index will be less than the size of commandHistory. If redo is not executed before a new command is added, all commands in the list after index will be deleted.
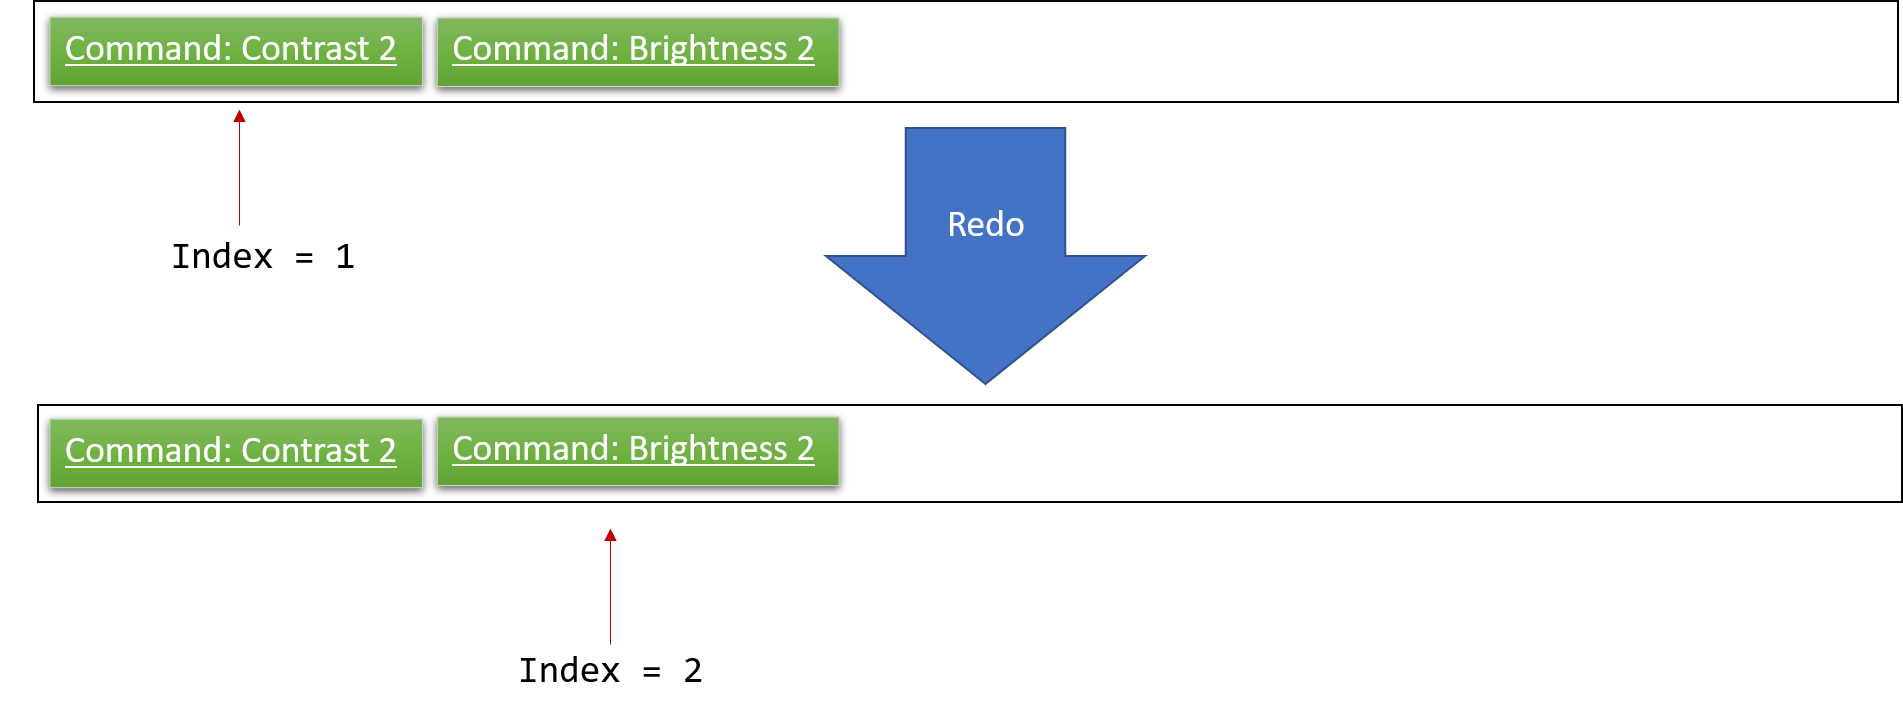
For redo, it will call setRedo and retrieve that command to apply it on the current image.
If the Image#index is 0, pointing to the initial image, then there are no previous commands to restore. The undo command uses CurrentEdit#canUndoTemp() to check if this is the case. If so, it will return an error to the user rather than attempting to perform the undo.
|
The following sequence diagram shows how the undo operation works:
The redo command does the opposite — it calls CurrentEdit#setRedoTemp(), which shifts the index once to the right, pointing to the previously undone command, and executes that command to perform the transformation.
If the index is at index commandHistory.size(), pointing to the latest image state, then there is no undone transformation to restore. The redo command uses CurrentEdit#canRedoTemp() to check if this is the case. If so, it will return an error to the user rather than attempting to perform the redo.
|
Step 5. The user executes saves, which calls CurrentEdit#saveToAssets(). This replaces the original image with the temp image since a name is not specified. When this happens, the user can no longer call undo as there is no original image to work on. The command history is also cleared.
Design Considerations
Aspect: How undo & redo executes
-
Alternative 1: Saves each transformation as a separate image.
-
Pros: Easy to implement.
-
Cons: May have performance issues in terms of memory usage.
-
-
Alternative 2(current choice): Save all transformation in a list and apply them when undo/redo is called. We chose this method as we do not want our application to take up too much space in the PC.
-
Pros: Will use less memory
-
Cons: We must ensure that the implementation of each individual command is correct.
-
Aspect: Data structure to support the undo/redo commands
-
Alternative 1 (current choice): Use a list to store the history of commands. We chose this so as to preserve good object-oriented programming principles.
-
Pros: Easy for new computer science student undergraduates to understand, who are likely to be the new incoming developers of our project.
-
Cons: Logic is duplicated twice. For example, when a new command is executed, we must remember to update both
HistoryManagerandImage.
-
-
Alternative 2: Use
HistoryManagerfor undo/redo-
Pros: We do not need to maintain a separate list, and just reuse what is already in the codebase.
-
Cons: Requires dealing with commands that have already been undone: We must remember to skip these commands. Violates single responsibility principle and separation of concerns as
HistoryManagernow needs to do two different things.
-