By: W14-2 Since: Feb 2019 Licence: MIT
1. Setting up
1.1. Prerequisites
-
JDK
9or laterJDK 10on Windows will fail to run tests in headless mode due to a JavaFX bug. Windows developers are highly recommended to use JDK9. -
IntelliJ IDE
IntelliJ by default has Gradle and JavaFX plugins installed.
Do not disable them. If you have disabled them, go toFile>Settings>Pluginsto re-enable them.
1.2. Setting up the project in your computer
-
Fork this repo, and clone the fork to your computer
-
Open IntelliJ (if you are not in the welcome screen, click
File>Close Projectto close the existing project dialogue first) -
Set up the correct JDK version for Gradle
-
Click
Configure>Project Defaults>Project Structure -
Click
New…and find the directory of the JDK
-
-
Click
Import Project -
Locate the
build.gradlefile and select it. ClickOK -
Click
Open as Project -
Click
OKto accept the default settings -
Open a console and run the command
gradlew processResources(Mac/Linux:./gradlew processResources). It should finish with theBUILD SUCCESSFULmessage.
This will generate all the resources required by the application and tests. -
Open
MainWindow.javaand check for any code errors-
Due to an ongoing issue with some of the newer versions of IntelliJ, code errors may be detected even if the project can be built and run successfully
-
To resolve this, place your cursor over any of the code section highlighted in red. Press ALT+ENTER, and select
Add '--add-modules=…' to module compiler optionsfor each error
-
-
Repeat this for the test directory as well (e.g. check
HelpWindowTest.javafor code errors, and if so, resolve it the same way)
1.3. Verifying the setup
-
Run the
seedu.address.MainAppand try a few commands -
Run the tests to ensure they all pass.
1.4. Configurations to do before writing code
1.4.1. Configuring the coding style
This project follows oss-generic coding standards. IntelliJ’s default style is mostly compliant with ours but it uses a different import order from ours. To rectify,
-
Go to
File>Settings…(Windows/Linux), orIntelliJ IDEA>Preferences…(macOS) -
Select
Editor>Code Style>Java -
Click on the
Importstab to set the order-
For
Class count to use import with '*'andNames count to use static import with '*': Set to999to prevent IntelliJ from contracting the import statements -
For
Import Layout: The order isimport static all other imports,import java.*,import javax.*,import org.*,import com.*,import all other imports. Add a<blank line>between eachimport
-
Optionally, you can follow the UsingCheckstyle.adoc document to configure Intellij to check style-compliance as you write code.
1.4.2. Updating documentation to match your fork
After forking the repo, the documentation will still have the SE-EDU branding and refer to the se-edu/addressbook-level4 repo.
If you plan to develop this fork as a separate product (i.e. instead of contributing to se-edu/addressbook-level4), you should do the following:
-
Configure the site-wide documentation settings in
build.gradle, such as thesite-name, to suit your own project. -
Replace the URL in the attribute
repoURLinDeveloperGuide.adocandUserGuide.adocwith the URL of your fork.
1.4.3. Setting up CI
Set up Travis to perform Continuous Integration (CI) for your fork. See UsingTravis.adoc to learn how to set it up.
After setting up Travis, you can optionally set up coverage reporting for your team fork (see UsingCoveralls.adoc).
| Coverage reporting could be useful for a team repository that hosts the final version but it is not that useful for your personal fork. |
Optionally, you can set up AppVeyor as a second CI (see UsingAppVeyor.adoc).
| Having both Travis and AppVeyor ensures your App works on both Unix-based platforms and Windows-based platforms (Travis is Unix-based and AppVeyor is Windows-based) |
1.4.4. Getting started with coding
When you are ready to start coding,
-
Get some sense of the overall design by reading Section 2.1, “Architecture”.
-
Take a look at Appendix A, Product Scope.
2. Design
2.1. Architecture

The Architecture Diagram given above explains the high-level design of the App. Given below is a quick overview of each component.
The .pptx files used to create diagrams in this document can be found in the diagrams directory. To update a diagram, modify the diagram in the pptx file, select the objects of the diagram, and choose Save as picture.
|
Main has only one class called MainApp. It is responsible for,
-
At app launch: Initializes the components in the correct sequence, and connects them up with each other.
-
At shut down: Shuts down the components and invokes cleanup method where necessary.
Commons represents a collection of classes used by multiple other components.
The following class plays an important role at the architecture level:
-
LogsCenter: Used by many classes to write log messages to the App’s log file.
The rest of the App consists of four components.
Each of the first three components does the following:
-
Defines its API in an
interfacewith the same name as the Component. -
Exposes its functionality using a
{Component Name}Managerclass.
The Model component consists of three components:
-
Albumwhich stores the pool of images that has been imported into the App. -
CurrentEditwhich holds the image that the App is currently editing in-memory. -
TransformationSetwhich stores the preset commands created by the user to edit the image.
For example, the Logic component (see the class diagram given below) defines it’s API in the Logic.java interface and exposes its functionality using the LogicManager.java class.

How the Architecture Components Interact with Each Other
The Sequence Diagrams below show how the components interact with each other for the scenarios where the user keys in the commands import C:\Users\XXX\Desktop\Pictures and rotate 90.

import C:\Users\XXX\Desktop\Pictures command
rotate 90 commandThe sections below give more details of each component.
2.2. UI component

API : Ui.java
The UI consists of a MainWindow that is made up of the following
components:
-
CommandBox -
ResultDisplay -
ImagePanel -
InitPanel -
InformationPanel -
StatusBarFooter -
HelpWindow
All components, including the MainWindow, inherit from the abstract UiPart class.
The InformationPanel comprises of three tabs:
-
Album Images
-
Displays all images currently opened in the
assetsdirectory and available for editing.
-
-
EXIF Profile
-
Displays all ancillary tags attached to the currently opened image such as metadata information like Date and Time and Copyright information.
-
-
Command History
-
Display all Image Transformation and Image Filters applied to the currently opened image.
-
The UI component is supplemented by a Notifier class. The class implements Java’s propertyChangeListener as a means of drawing updates to the User Interface.
For example, the ImageView component draws updates to an opened image in the following sequence:
-
Register the
ImageViewcomponent with theNotifierclass. -
Notifieris called whenOpencommand is executed with a given Property Name. -
Notifierfires an alert with the Property Name to all registered listener. -
ImageViewchecks if the Property Name is pertaining to it and redraws the image shown by accessingAlbum.
The UI component uses JavaFx UI framework. The layout of these UI parts are defined in matching .fxml files that are in the src/main/resources/view directory.
|
2.3. Logic component

API :
Logic.java
-
Logicuses theFomoFotoParserclass to parse the user command. -
This results in a
Commandobject which is executed by theLogicManager. -
The command execution can affect the
CurrentEdit(e.g. rotating an image) andAlbum(e.g. saving an image). -
The result of the command execution is encapsulated as a
CommandResultobject which is passed back to theUi. -
In addition, the
CommandResultobject can also instruct theUito perform certain actions, such as displaying help to the user.
Given below are the Sequence Diagrams for interactions within the Logic component for the execute("import C:\User\Pictures\image.png") and execute("rotate 90") API call.
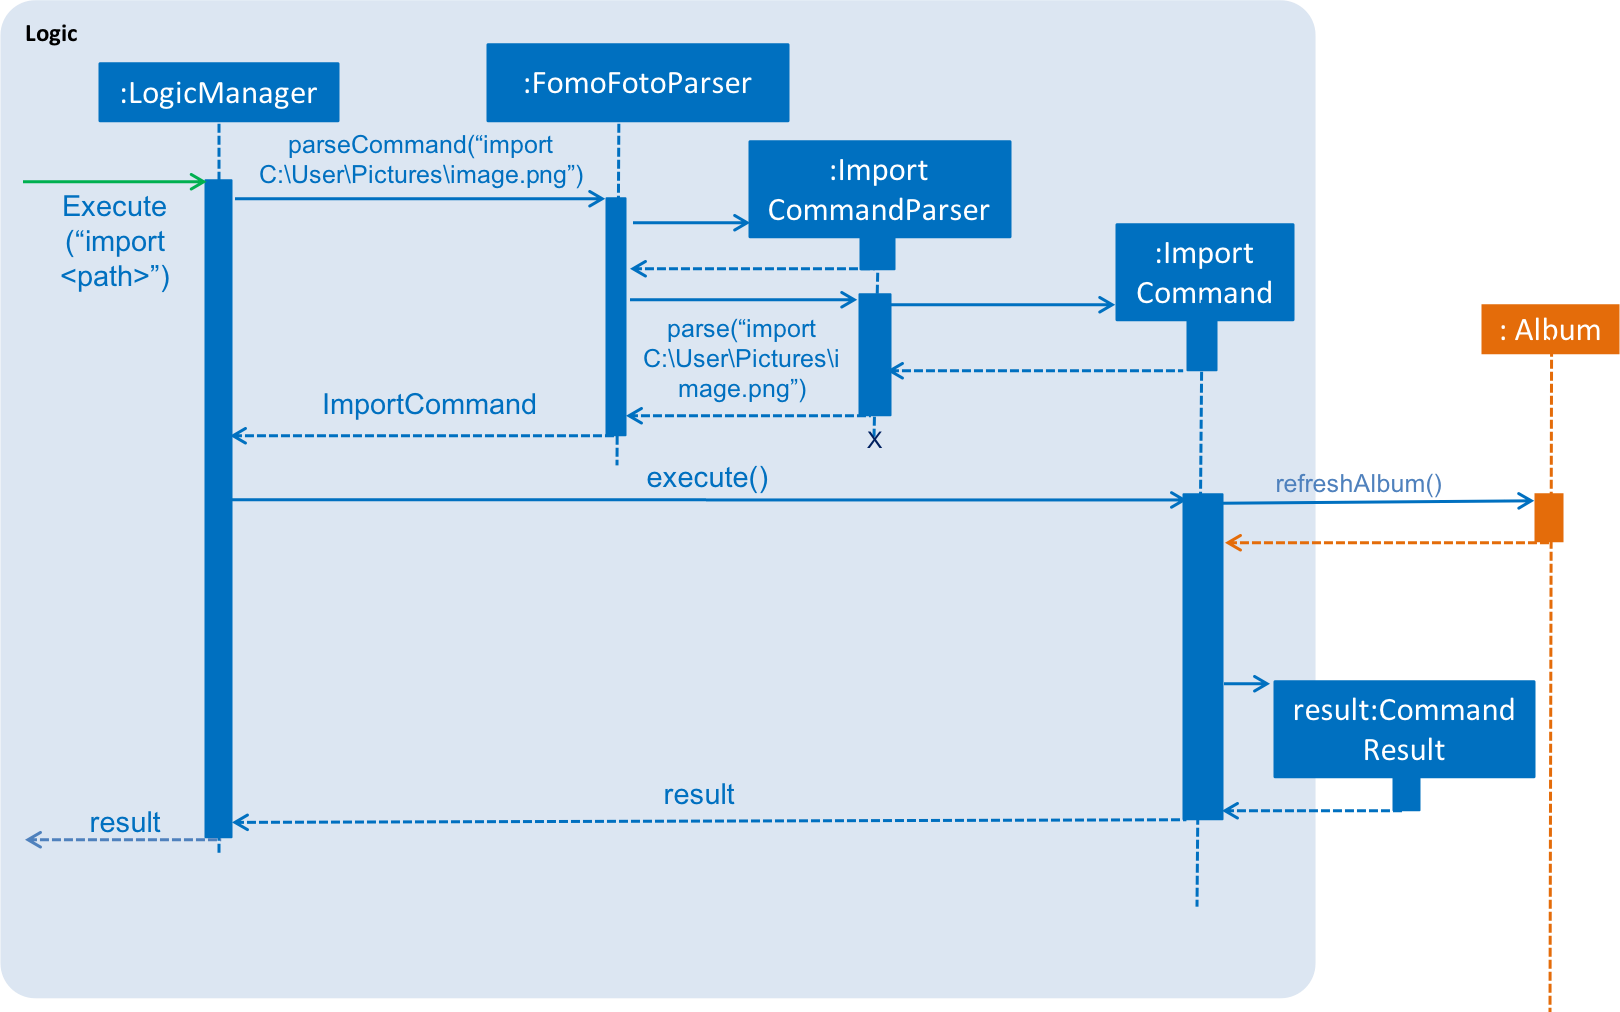
import C:\User\Pictures\image.png Command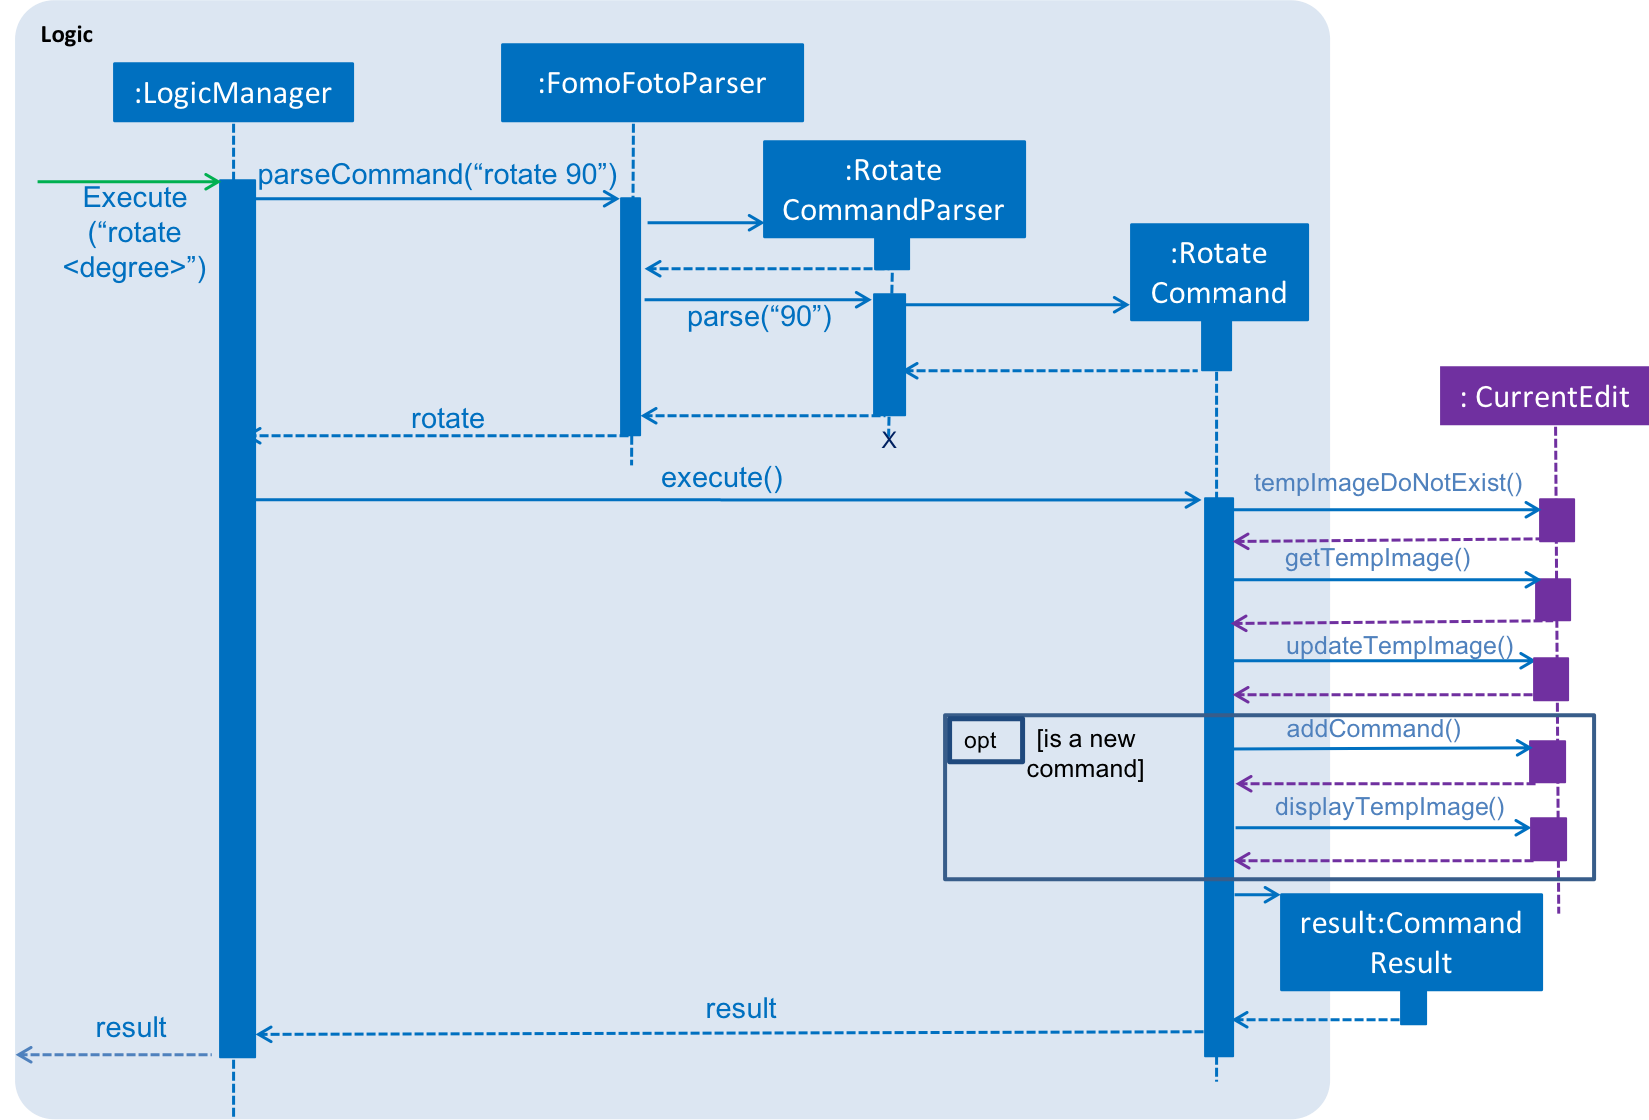
rotate 90 Command2.4. Model component
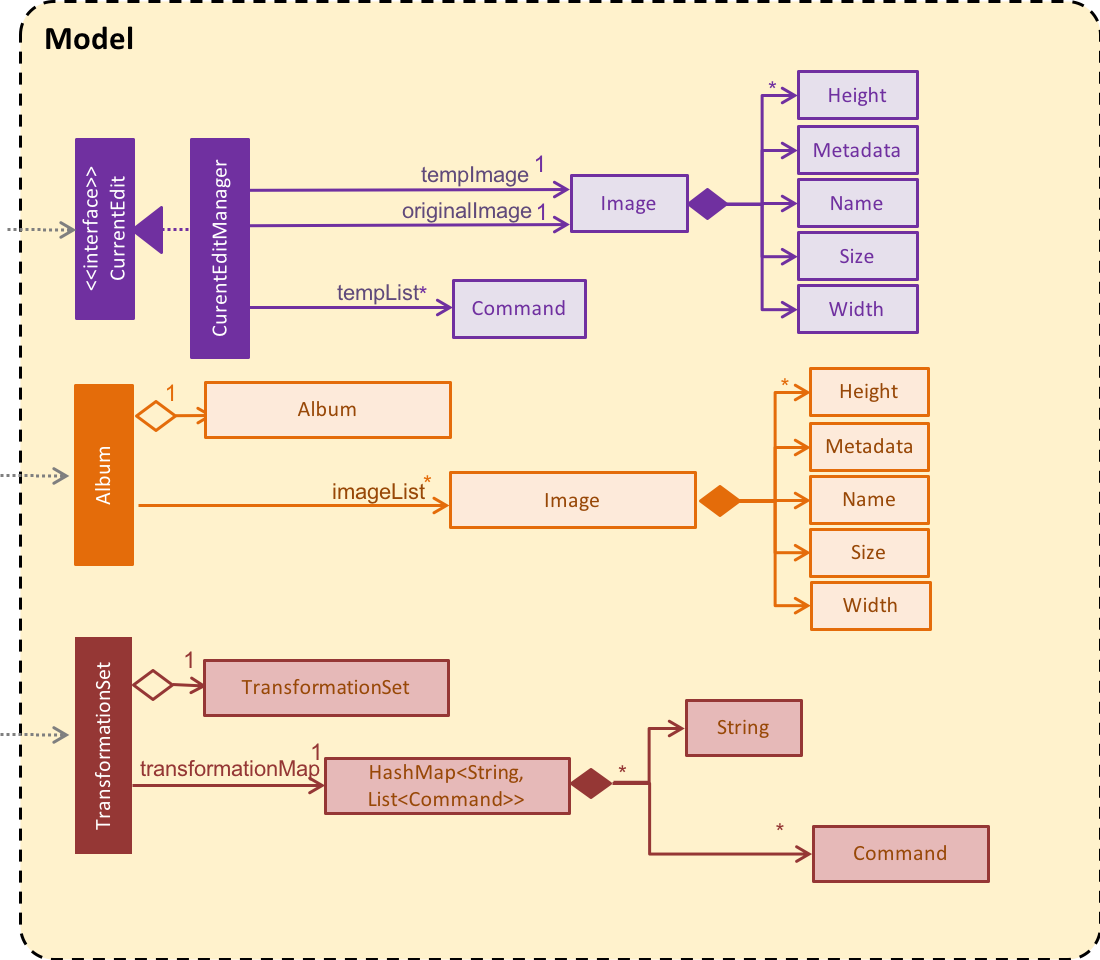
API : CurrentEdit.java, Album.java, Image.java
The Model component comprises of three main classes, CurrentEdit, TransformationSet and Album.
The core functions of the CurrentEdit Class are listed below:
-
stores an
Imageinstance intempImageandoriginalImagewhen an image is opened. -
creates a copy of the opened image and the currently edited image in
tempdirectory. -
tempImageis updated each time a command to edit the image is called. (e.g.RotateCommand,ContrastCommand) -
stores a list of commands that the user input after an image is opened.
-
contains methods to access
tempdirectory.
The TransformationSet class is implemented using the Singleton pattern. This design choice was made to ensure that only a single instance of TransformationSet is used in FomoFoto at runtime. This design also eliminates redundant passing of instance variables of TransformationSet across all logic and model components.
The core functions of the Transformation class are listed below:
-
Stores a reference to all the preset commands saved by the user as a HashMap that contains a
Stringas a key and a `List<Command>`as a value. -
Contains various helper methods to access the HashMap that stores the preset commands.
The Album class is also implemented using the Singleton pattern. This design choice was purposely made as only a single instance of Album should reside in FomoFoto at any one time. This design also reduces the need for passing instance variables across all logic and model components.
The core functions of the Album class are listed below:
-
Stores a reference to all imported images as List.
-
Contains various helper methods to access the
assetsdirectory, the storage for the raw image files. -
Fires property changes to listeners attached to the
Notifierto redraw UI elements.
The Model also comprises of a smaller subclass, Image.
The Image class encapsulates the fields of a raw image file. This design choice allows for better abstraction between classes and easy reuse between commands.
The core functions of the Image class are listed below.
-
Validation checks to see if a raw image is a valid Image.
-
Keeps a command history of edits executed on this Image.
2.5. Storage component
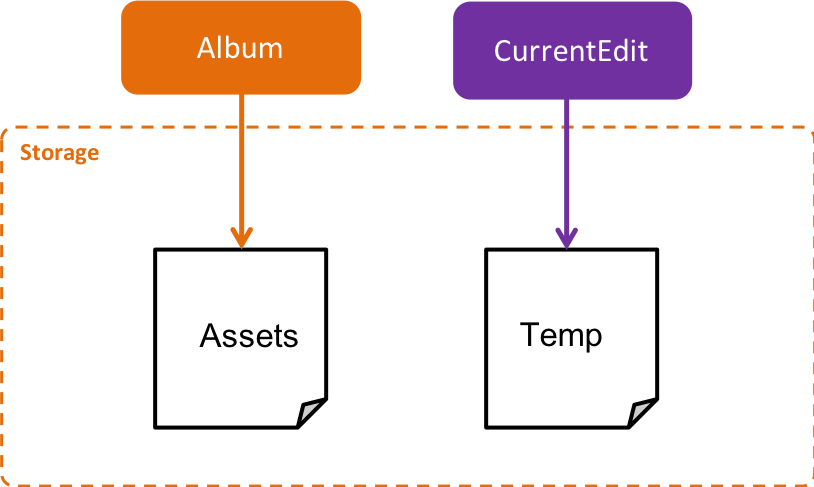
The assets and temp directories form the storage component of FomoFoto.
-
The
assetsdirectory stores images that the user imported -
The
tempdirectory stores the image that the program is currently editing on. -
The
Albumclass contains methods to save and retrieve images from theassetsdirectory. -
The
CurrentEditclass contains methods to overwrite and retrieve the image that the program is currently editing on.
The assets and temp directory from the storage component of FomoFoto. Both directories are created during runtime of the application.
The assets directory is created in the same directory where FomoFoto is first launched and persist between sessions. The assets directory is marked as FomoFoto.assets.
The temp directory is created per FomoFoto session. The target directory for the Temporary File directory is in both Windows and OS X. The temp directory is removed on program exit.
If FomoFoto is not given the permissions to write assets and temp to their respective directories i.e. limited write permissions, the application might not function properly.
|
2.6. Common classes
Classes used by multiple components are in the seedu.addressbook.commons package.
3. Implementation
This section describes some noteworthy details on how certain features are implemented.
3.1. Export Feature
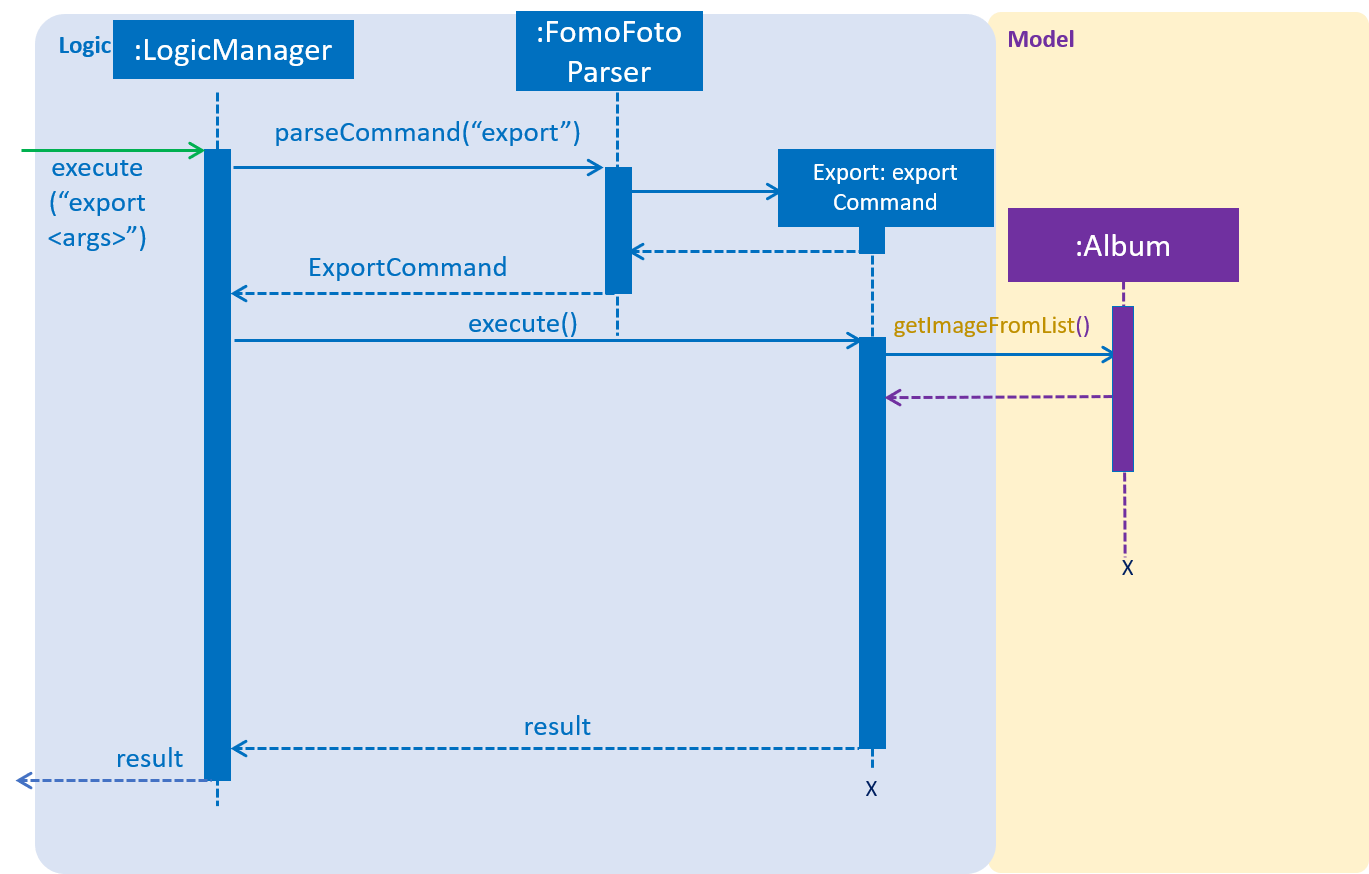
The export command exports a file in the album into a specified directory.
3.1.1. Current Implementation
The export function is facilitated by Album. It uses the following operations:
-
Album#getImageFromList(String)- returns an image from the album with name matching the input string and null if no image matches the input string.
Given below is an example usage scenario and how the export mechanism behaves at each step.
Step 1. The user executes export f/iu.jpg d/C:\Users\randy\Desktop.
Step 2. ExportCommandParser checks if the user has input the command correctly.
Step 3. Album#getImageFromList checks if the file to be exported exists in the album and throws a CommandException if it does not exist.
Step 4. ExportCommand#validPath checks if the specified directory is valid and throws a CommandException if it is not.
Step 5. If the file to be exported exists and directory is valid, the file will be copied to the directory.
The following sequence diagram shows how the export command works:
3.2. Import feature
The Import Command allows users to import a file of an image format into FomoFoto for editing.
3.2.1. Current implementation
The implementation of the import feature allows for users to either:
-
Import a single image file.
-
Import all image files in a directory.
-
Import a sample list of image files.
Image file must adhere to a subset of the following formats as describe by its MIME type standardized in IETF’s RFC 6838:
-
.bmp -
.jpegor.jpg -
.png -
.tifor.tiff -
.gif
Images with .tif or .tiff formats are not rendered on screen due to a limitation with JavaFX but edits made will still be applied.
|
Images must also adhere to the following additional requirements:
-
Not be hidden or prepended by a
.dot identifier. -
Not be over 10MB in size.
-
Not have the same name as an existing image in the Album.
Implementation of these checks can be found in ImportCommandParser.
|
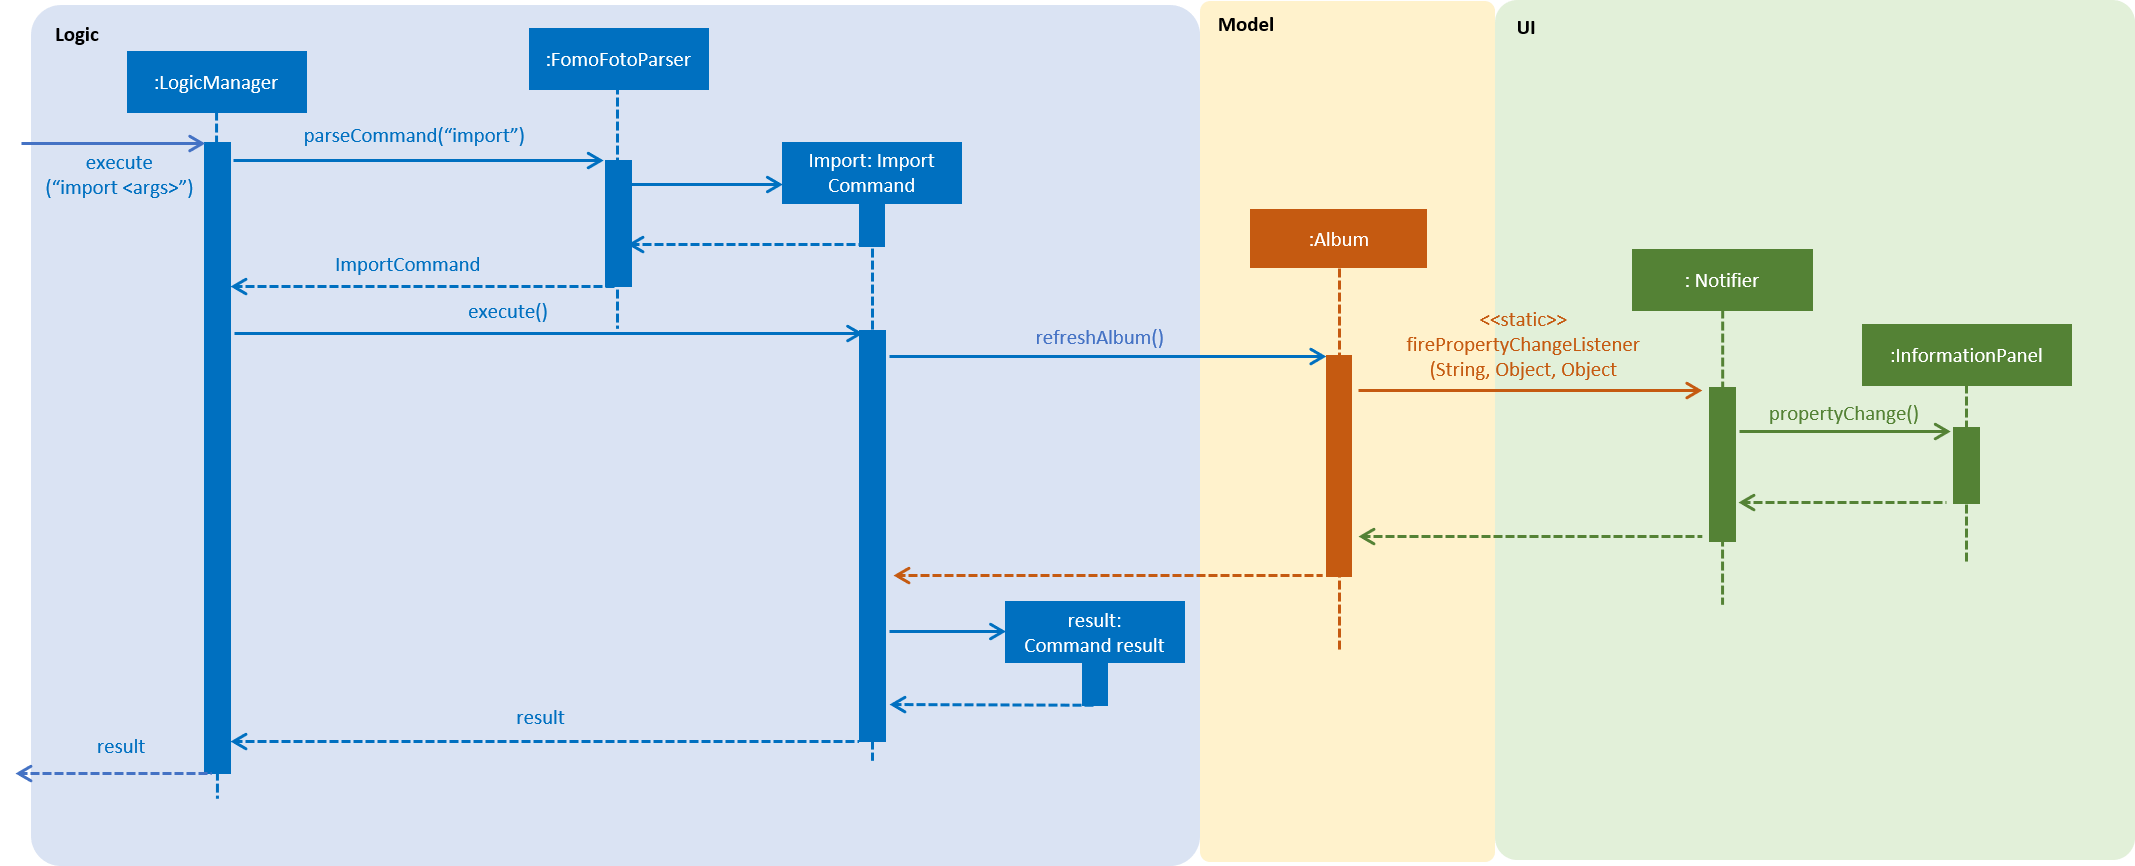
Images found in the given arguments will be copied to an assets directory created at runtime in FomoFoto’s home directory. This is facilitated by the Album class and ImportCommandParser and contains the following operation:
-
Album#refreshAlbum()- Fires a property change to all registered listeners. Listeners addressing this particular property will trigger and update accordingly. -
ImportCommandParser#parse(String)- Takes in an absolute path, perform sanity checks on availability, size, format and copies the image toassetsdirectory.
Additionally, the import sample command is supported by the ResourceWalker class. This class traverses through a sample directory of valid image files and populates FomoFoto.
Example usage scenario:
-
The user launches the application and enters
import C:\Users\Addison\Desktop\sample.png -
ImportCommandParsertakes in arguments and performs validation on a given path. Image is copied toassetsdirectory and added to Album if it is valid. -
Albumdisplay the imported image to UI by calling theNotifierclass which calls on the display panel listening to the notifier. -
InformationPanelupdates to reflect the imported image in the Album.
3.2.2. Design Considerations
-
Alternative 1: Import single images only.
-
Pros: Easy to implement.
-
Cons: Importing multiple images from the same directory needs repeated commands.
-
-
Alternative 2 (Current Choice): Import images from a directory as well.
-
Pros: Can import many images without repeating the command.
-
Cons: Can result in errors if too many images are imported or images are of alternative formats.
-
3.3. Open Feature
This command allows the user to open a previously imported image for editing.
3.3.1. Current Implementation
The open function is facilitated by Album and CurrentEdit. It uses the following operations:
-
Album#checkFileExist(String)- Checks if file name specified by theStringexists in assets directory. -
Album#retrieveImage(String)- Returns anImagespecified by theStringin assets directory. -
CurrentEdit#openImage(Image)- Creates two copies of the opened image intempdirectory. The duplicated images are instantiated astempImageandoriginalImage. -
CurrentEdit#updateExif()- Updates the Exif data of the image. -
CurrentEdit#displayTempImage()- Displays the temporary image stored in thetempdirectory.
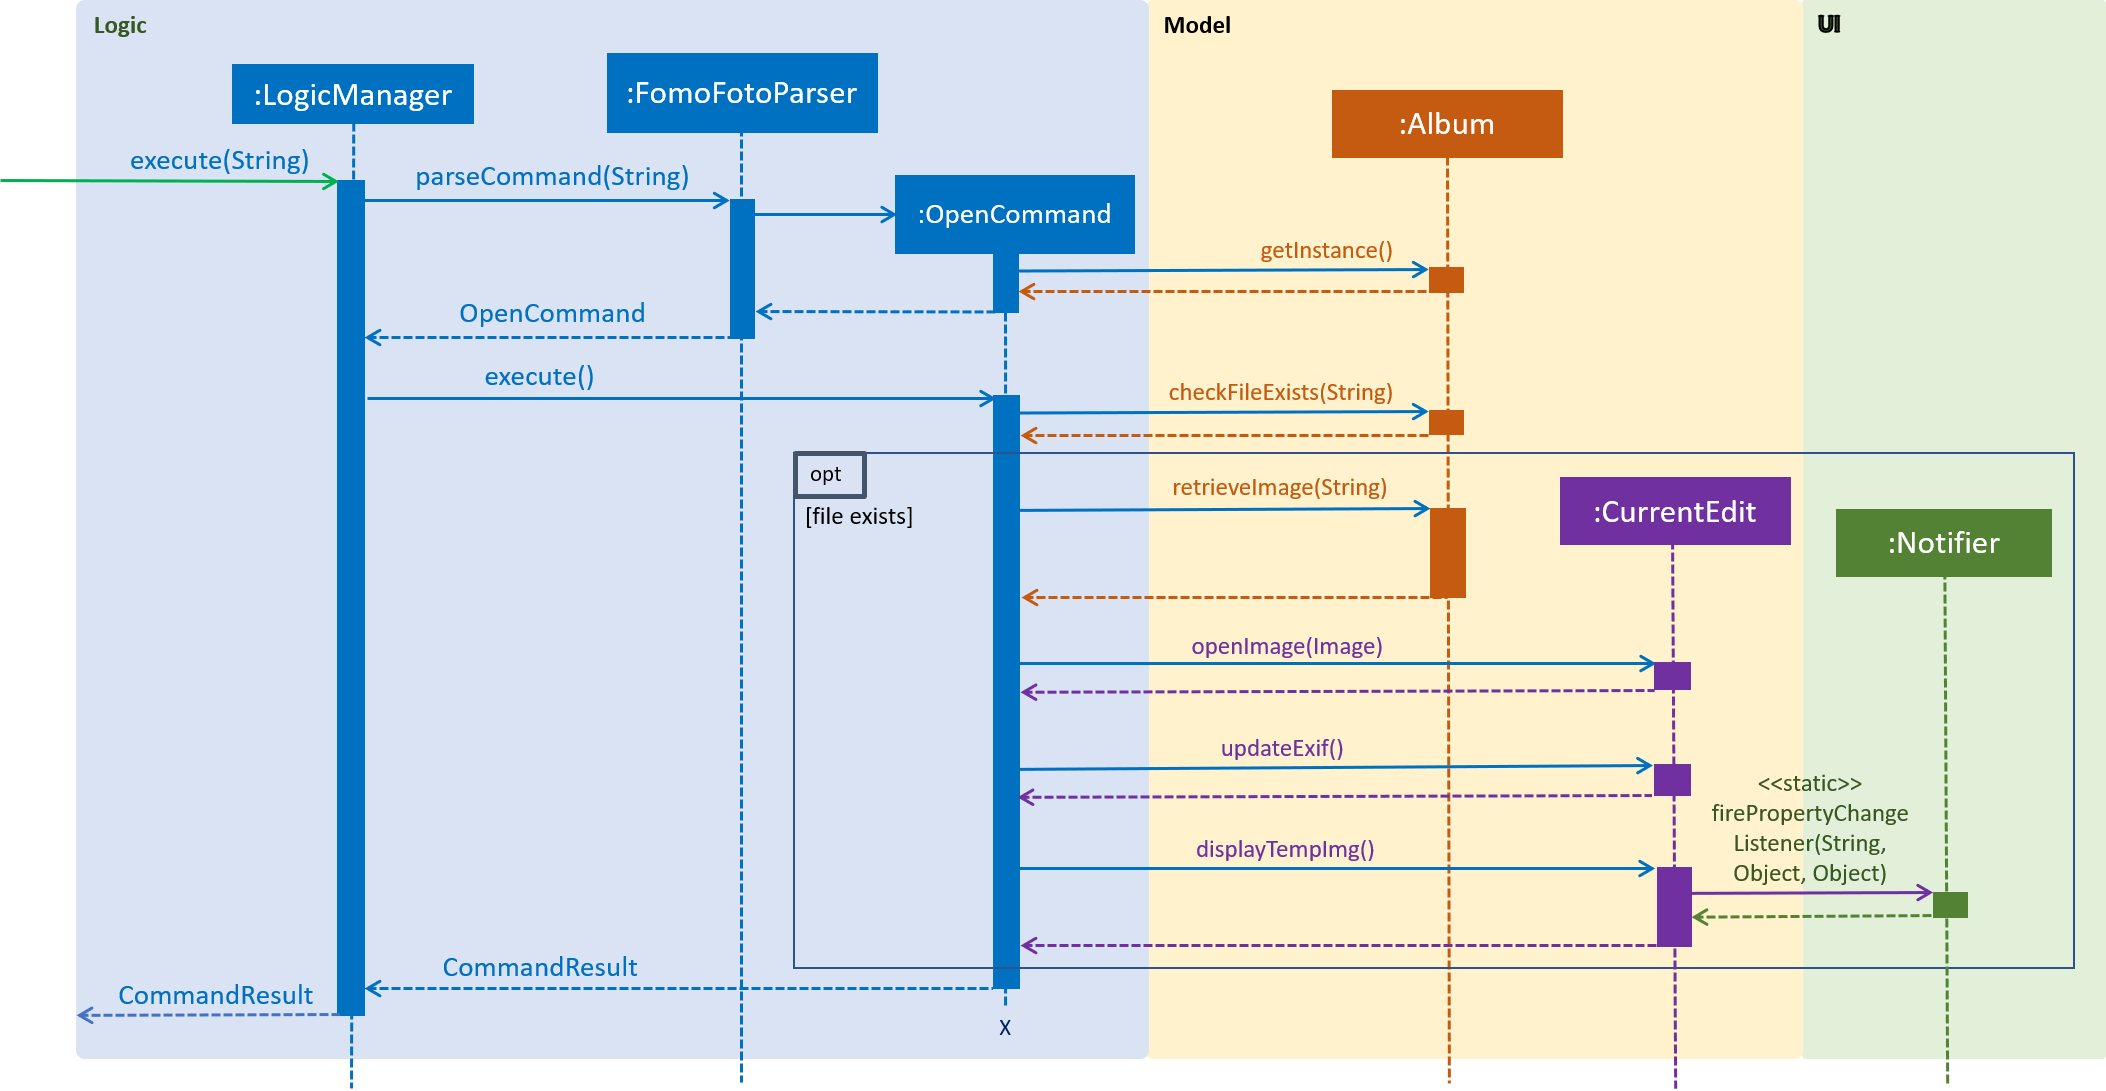
The following is an example usage scenario of how open behaves at each step as shown in the figure above.
Step 1. The user executes open sample.png.
Step 2. Album#checkFileExist(String) is called to check if the file specified by the String is in assets directory. If it exists, Album#retrieveImage(String) is called to create an Image object from the specified file. Otherwise, CommandException is thrown.
Step 3. The Image is passed to CurrentEdit#openImage(Image) to create two copies of it, named temp_img.png and ori_img.png, in temp directory. These copies are then instantiated as tempImage and originalImage.
Step 4. CurrentEdit#updateExif() is called to update the information of the opened image.
Step 5. CurrentEdit#displayTempImage() is called to display the opened image on the GUI.
3.3.2. Design Considerations
-
Alternative 1 (current choice): The user can only open and edit one image at a time.
-
Advantages:
-
Easy to implement.
-
Saves space as
tempdirectory only stores one original image and one temporary image. -
Clear to users that edits are done to the only opened image.
-
-
Disadvantage: Only one image can be edited at a time.
-
-
Alternative 2: The user can open and edit multiple images.
-
Advantage: Images can be edited simultaneously.
-
Disadvantages:
-
Hard to distinguish whether the user is opening an image from
assetsortempdirectory. -
Requires many duplicates with different temporary names.
-
May be confusing for the user.
-
-
Alternative 1 was chosen as it is less complicated, requires lesser space and more user-friendly.
3.4. List Files Feature
This command displays the names of all the files in the assets directory.
3.4.1. Current Implementation
The listfiles function is facilitated by Album. It uses the following operation:
-
Album#getFileNames()- Returns a list of all the files inassetsdirectory.
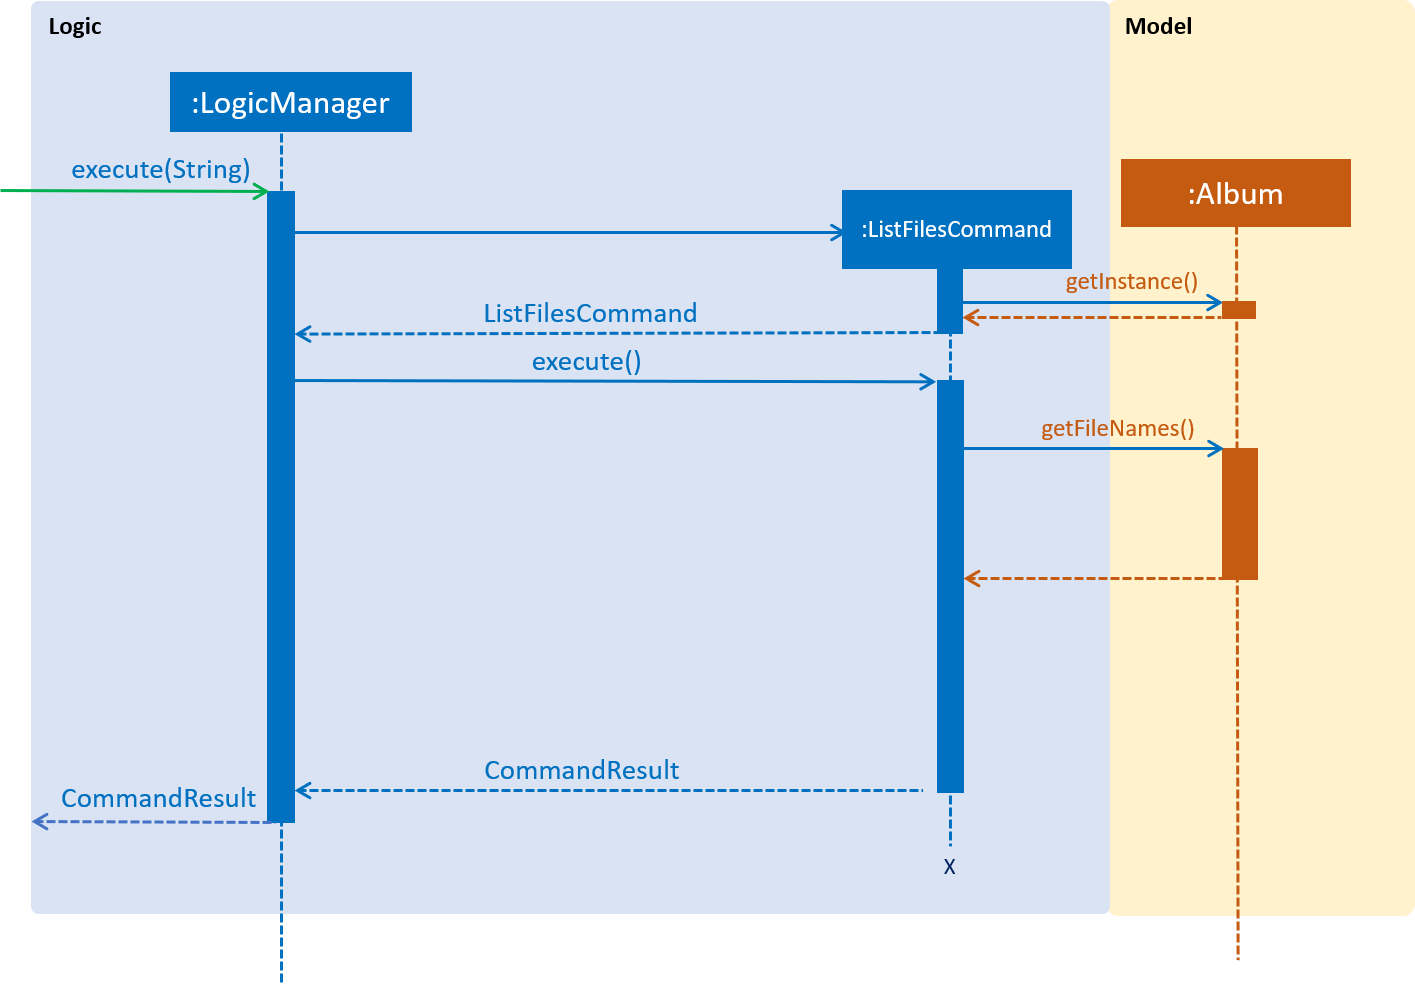
The following is an example usage scenario of how listfiles behaves at each step as shown in the figure above.
Step 1. The user executes listfiles.
Step 2. Album#getFileNames() accesses assets directory and returns all the file names in a String array.
Step 3. The String array is displayed on the GUI.
3.4.2. Design Considerations
This command was created to allow the user to know what files are stored in assets directory so that the FILENAME can be easily referenced for open.
3.5. Image Filters
3.5.1. Current Implementation
The filter mechanism is facilitated by scrimage, an external API Library that provides image filters methods for our image editor. The gradle script declares a compile-time dependency on this external API through the coordinates: group: 'com.sksamuel.scrimage', name: 'scrimage-filters_2.12', version: '3.0.0-alpha4'.
The image filters feature is facilitated by CurrentEdit. It uses the following operations:
-
CurrentEdit#tempImageDoNotExist()- ReturnstrueiftempImageinCurrentEditis null.tempImageis null only ifopencommand is never called. -
CurrentEdit#getTempImage- Retrieves the temporary imagetempImagewhich stores the filepath of the temporary image, its history of edits [List<Command>] and its metadata. -
CurrentEdit#updateTempImage- Replaces the temporary image in thetempdirectory with the newly edited image and updates thetempImageinstance in the class. -
CurrentEdit#addCommand- Adds this command to the edit history [List<Command>] intempImagefor theundo/redocommand. -
CurrentEdit#displayTempImage()- Displays the temporary image stored in thetempdirectory.
The filter feature mainly consists of:
-
ContrastCommand: Applies adoublecontrast ratio value on the opened image. Thedoublecontrast ratio value is preset to 1.1 if a specifieddoubleratio value is not given by the user. A value above 1 (e.g 1.3) increases the contrast of the image while a positive value below 1 (e.g 0.5) reduces the contrast of the image. -
BrightnessCommand: Applies adoublebrightness ratio value on the opened image. Thedoublebrightness ratio value is preset to 1.1 if a specifieddoubleratio value is not given by the user. A value above 1 (e.g 1.3) increases the brightness of the image while a positive value below 1 (e.g 0.5) reduces the brightness of the image. -
BlackWhiteCommand: Transforms the opened image to a black and white image given a threshold value. The thresholdintegervalue is preset to 127 if a specified threshold is not given by the user. Pixels on the image lighter than the threshold value will become white and pixels darker than the threshold value will become black.
The following describes the main operations and processes for each command stated above.
3.5.2. Contrast Command
This command calls for an adjustment of contrast on an opened image. After adjusting the contrast, it adds this specific command called by the user to the List<Commands> belonging to the tempImage found in CurrentEdit which saves the editing history of the opened image.
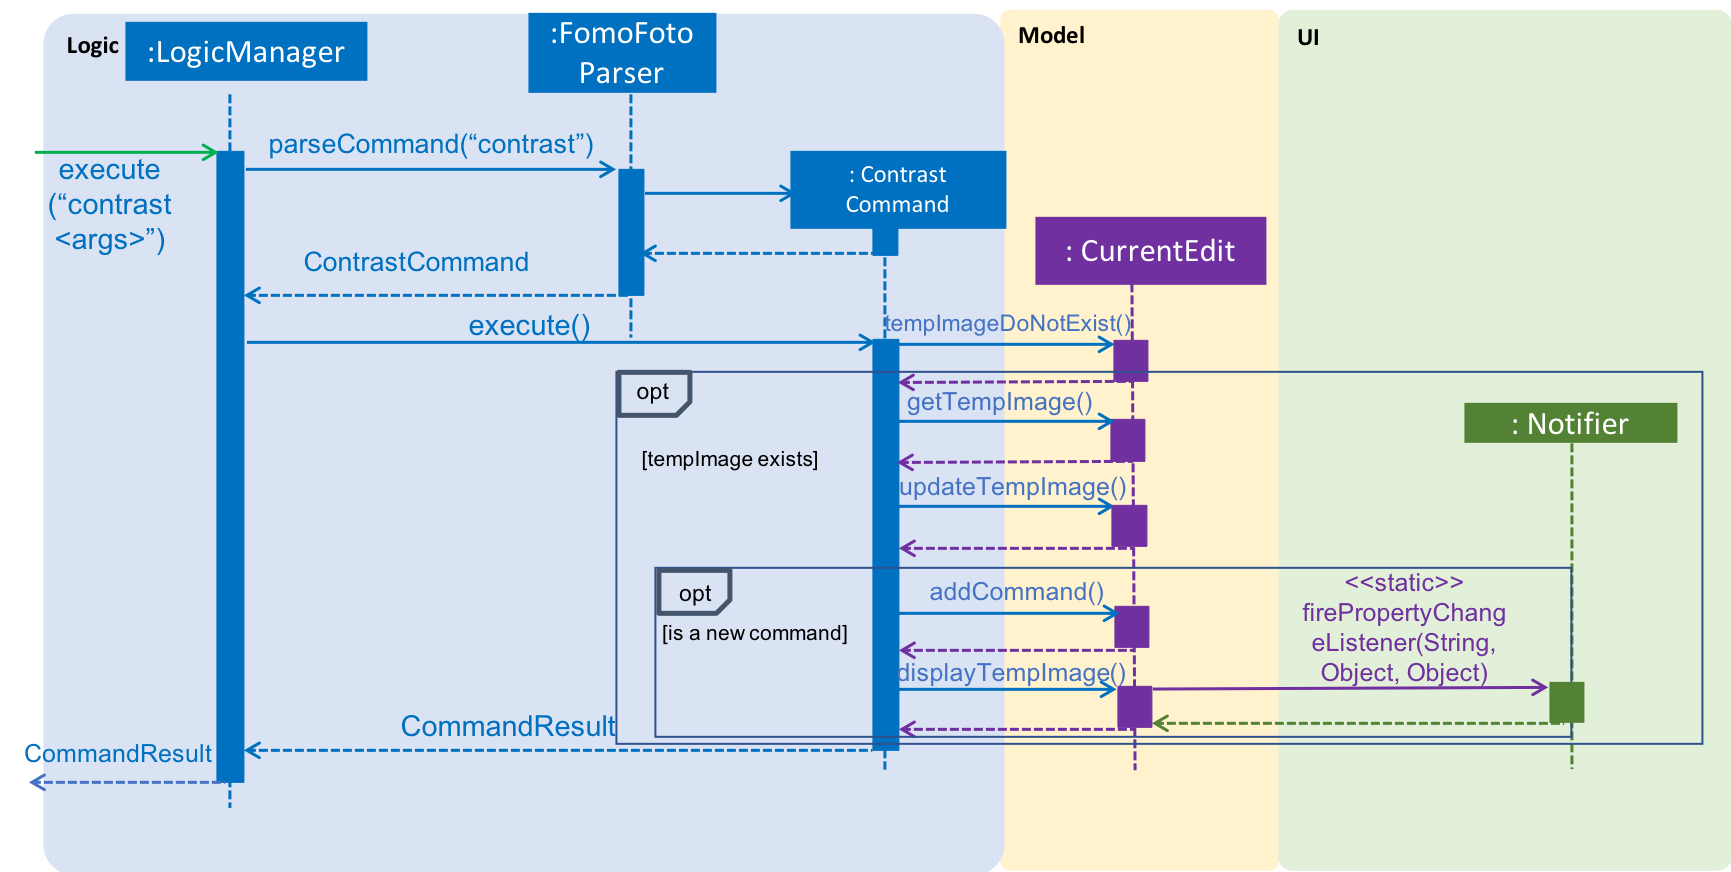
Given below is an example usage scenario of how contrast behaves at each step as shown in Figure 15, “Sequence Diagram for Contrast Command”. [This applies to the other image filter commands as well.]
Step 1. When the user runs an open command to edit an image, it invokes a method which creates an instance of an Image that stores the file path of the image, its history of edits [List<Command>] and its metadata. This Image object is saved under the variable name tempImage in CurrentEdit for editing.
Step 2. When the user enters the command (e.g. contrast 0.3), the entered command is parsed and the command will be executed.
| If an invalid command is provided, a reminder of how to use the command will be given to the user and no command will be executed. |
Step 3. During execution, the execute method in the ContrastCommand class first invokes CurrentEdit#tempImageDoNotExist to check if an image is opened. If no image is opened, it will throw an error message to inform the user to open an image for editing first. Else, the execute method will invoke CurrentEdit#getTempImage() to get the tempImage from CurrentEdit.
Step 4. Upon retrieving the tempImage, the execute method creates a ContrastFilter instance provided by the external library [scrimage] which takes in a double contrast ratio value. This ContrastFilter will then be applied to the image retrieved from the file path of tempImage.
Step 5. After applying the ContrastFilter on the opened image, CurrentEdit#updateTempImage() is invoked to save the newly edited image and replace the previous one in the file path of the tempImage.
Step 6. The execute method then checks if the boolean isNewCommand is true. If it is true, it indicates that the command is a new contrast command called directly from the user and not through an undo/redo command. This triggers Step 7 in the line below. Otherwise, the command’s execution ends in this step.
Step 7. isNewCommand is set to false to signal that this command is not a new contrast command if it is executed again through the undo/redo command.
Step 8. CurrentEdit#addCommand(this) is invoked to add this command to the List<Command> in tempImage for the undo/redo function and CurrentEdit#displayTempImage() is used to display the edited image on the graphical user interface.
Design Considerations
-
Intermediate images that are still being edited have to be stored in a temporary folder first due to our
undo/redoimplementation.
3.5.3. Brightness Command
This command calls for an adjustment of brightness on an opened image. After adjusting the brightness, it adds this specific command called by the user to the List<Commands> belonging to the tempImage found in currentEdit which saves the editing history of the opened image.
Refer to the example usage scenario, sequence diagram and design considerations in Section 3.5.2, “Contrast Command”.
3.5.4. BlackWhite Command
This command calls for a transformation of an opened image to a black and white image. After applying the black and white filter, it adds this specific command called by the user to the List<Commands> belonging to the tempImage found in currentEdit which saves the editing history of the opened image.
Refer to the example usage scenario, sequence diagram and design considerations in Section 3.5.2, “Contrast Command”.
3.6. Image Manipulation
3.6.1. Current Implementation
This segment involves manipulating the physical image itself, such as rotating, cropping and resizing. The implementations of these features are facilitated by ImgScalr Library, which is an external API Library that helps process the target image.
The manipulation feature is facilitated by CurrentEdit. It uses the following operations:
-
CurrentEdit#tempImageDoNotExist()- ReturnstrueiftempImageinCurrentEditis null.tempImageis null only ifopencommand is never called. -
CurrentEdit#getTempImage- Retrieves the temporary imagetempImagewhich stores the filepath of the temporary image, its history of edits [List<Command>] and its metadata. -
CurrentEdit#updateTempImage- Replaces the temporary image intempdirectory with the newly edited image and updates thetempImageinstance in the class. -
CurrentEdit#addCommand- Adds this command to the edit historyList<Command>intempImagefor theundo/redocommand. -
CurrentEdit#displayTempImage()- Displays the temporary image stored in thetempdirectory.
This manipulation feature mainly consists of:
-
RotateCommand: Allows users to rotate images by specifying a degree (90, 180 or 270 only). -
CropCommand: Allows users to crop images by specifying the coordinates of the top left corner, the width and the height of the desired cropped image. -
ResizeCommand: Allows users to resize images to the desired width and height.
The following describes the main operations and processes for each command stated above.
3.6.2. Rotate Command
This command allows the user to rotate the targeted image by specifying a degree (90, 180 or 270 only). Upon receiving an input degree from the user, the degree will be checked for its validity and will throw an error if the degree is not within the specified range. The command will then be added to the List<Commands> belonging to tempImage found in currentEdit which saves the editing history of the targeted image.
The diagram below illustrates how the Rotate Command works:
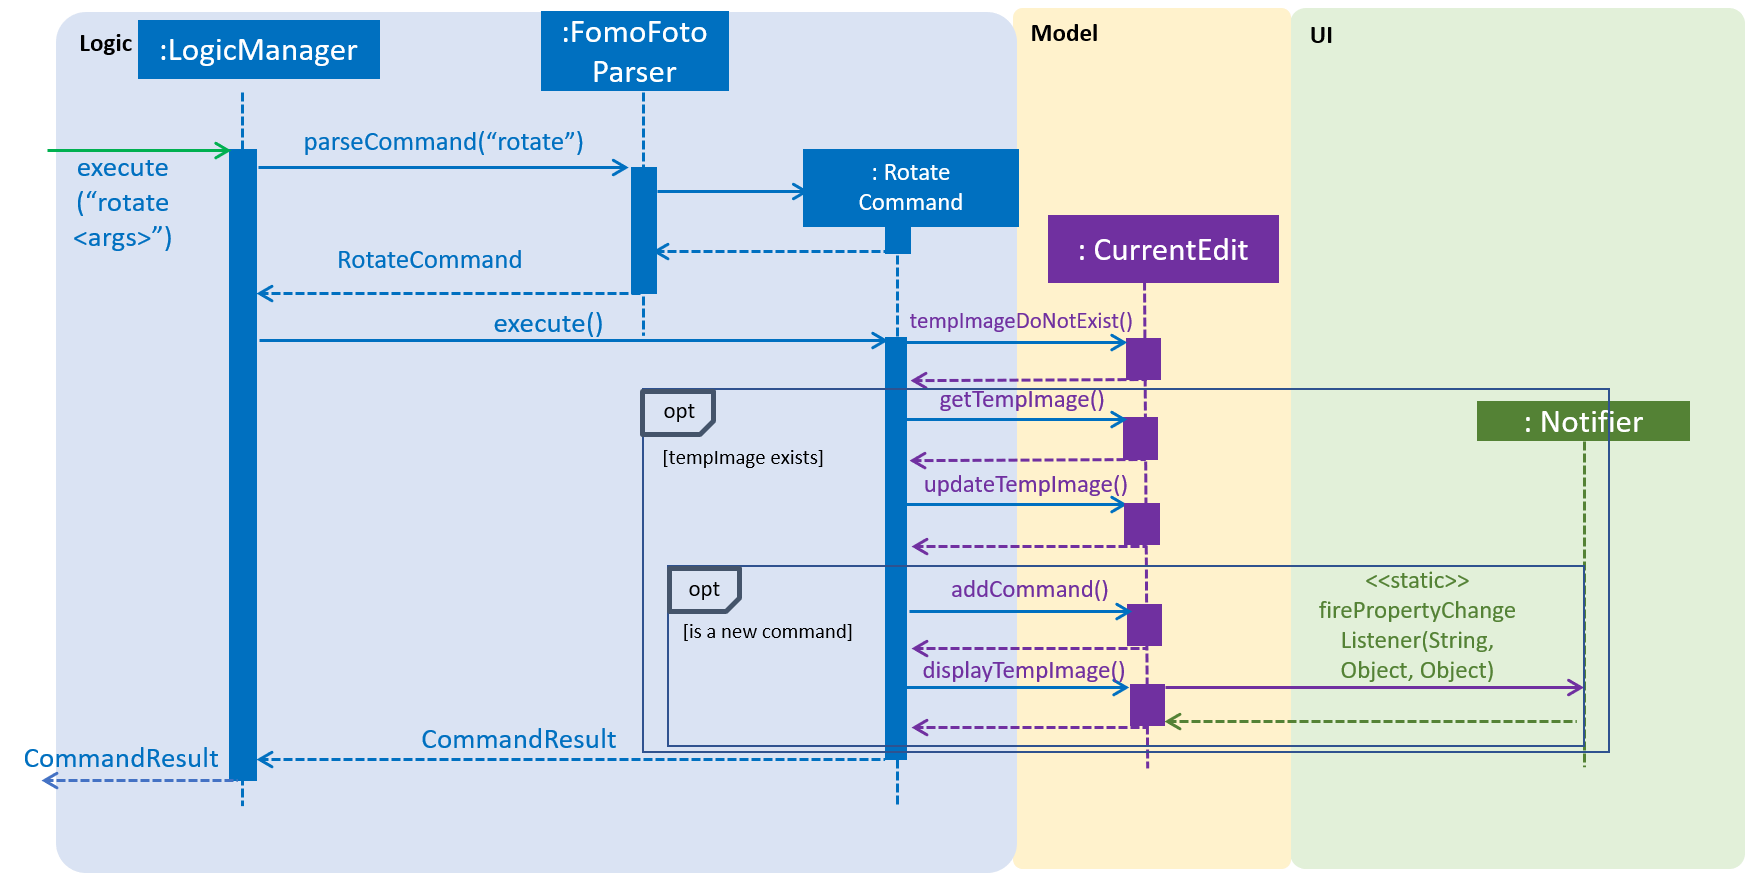
Given below is an example usage scenario and how the command should behave at each step. (This applies to the other image manipulation commands as well.):
Step 1. When the user runs an open command to edit an image, it invokes a method which creates an instance of an Image that stores the file path of the image, its history of edits List<Command> and its metadata. This Image object is saved under the variable name tempImage in currentEdit for editing.
Step 2. When the user enters the command (e.g. rotate 90), the entered command is parsed and the command will be executed.
| If an invalid command is provided, a reminder of how to use the command will be given to the user and no command will be executed. |
Step 3. During execution, the execute method in the RotateCommand class first invokes currentEdit#tempImageDoNotExist to check if an image is opened. If no image is opened, it will throw an error message to inform the user to open an image for editing. Else, the execute method will invoke currentEdit#getTempImage() to get the tempImage from CurrentEdit.
Step 4. Upon retrieving the tempImage, the execute method in RotateCommand gets a BufferedImage instance from tempImage.The method then calls the external library ImgScalr's class rotate and passes the BufferedImage object in.
Step 5. A BufferedImage object is returned from the external library and currentEdit#updateTempImage() is invoked to save the newly edited BufferedImage and replace the previous image in the file path of the tempImage.
Step 6. The execute method then checks if the boolean isNewCommand is true. If it is true, it indicates that the command is a new Rotate command called directly from the user and not through an undo/redo command which triggers Step 7 in the line below. Otherwise, the command’s execution ends in this step.
Step 7. isNewCommand is set to false to signal that this command is not a new rotate command if it is executed again through the undo/redo command. currentEdit#addCommand(this) is invoked to add this command to the List<Command> in tempImage for the undo/redo function and currentEdit#displayTempImage() is used to display the edited image on the graphical user interface.
Design Considerations
-
Images that are still being edited have to be stored and edited in a temporary directory first due to our
undo/redoimplementation.
3.6.3. Crop Command
This command allows the user to crop the targeted image by specifying the coordinates of the top left-hand corner of the desired image, the width of the desired image and the height of the desired image. Upon receiving the inputs, the values will be checked for their validity and will throw an error if any value is not within the specified range. The command will then be added to the List<Command> belonging to tempImage found in currentEdit which saves the editing history of the targeted image.
Refer to the example usage scenario, sequence diagram and design considerations in Section 3.6.2, “Rotate Command”.
3.6.4. Resize Command
This command allows the user to resize the targeted image by specifying the width and height of the desired image. Upon receiving the inputs, the values will be checked for their validity and will throw an error if any value is not within the specified range. The command will then be added to the List<Command> belonging to tempImage found in currentEdit which saves the editing history of the targeted image.
Refer to the example usage scenario, sequence diagram and design considerations in Section 3.6.2, “Rotate Command”.
3.7. Save Feature
This command applies the edits to the current image and saves it into assets directory.
3.7.1. Current Implementation
The save function is facilitated by Album and CurrentEdit. It uses the following operations:
-
CurrentEdit#tempImageDoNotExist()- ReturnstrueiftempImageinCurrentEditis null.tempImageis null only ifopencommand was never called. -
CurrentEdit#getTempImage()- Returns the latest edited image stored intempImageinCurrentEdit. -
CurrentEdit#getOriginalName()- Returns the original name of opened image. -
CurrentEdit#overwriteOriginal(String)- Replacesori_img.pngwithtemp_img.pngintempdirectory. UpdatesoriginalImagetotempImageandoriginalImageNametoStringinCurrentEdit. -
CurrentEdit#deleteHistory()- Clears the history inCurrentEdit. -
CurrentEdit#updateExif()- Updates the Exif data of the new image. -
Album#checkFileExist(String)- Checks if the file name specified by theStringexists in the assets directory. -
Album#saveToAssets(Image, String)- Saves theImageasStringintoassetsdirectory. -
Album#populateAlbum()- Updates list of images inAlbumclass. -
Album#refreshAlbum()- Updates and displays the latest images inassetsdirectory on the GUI.
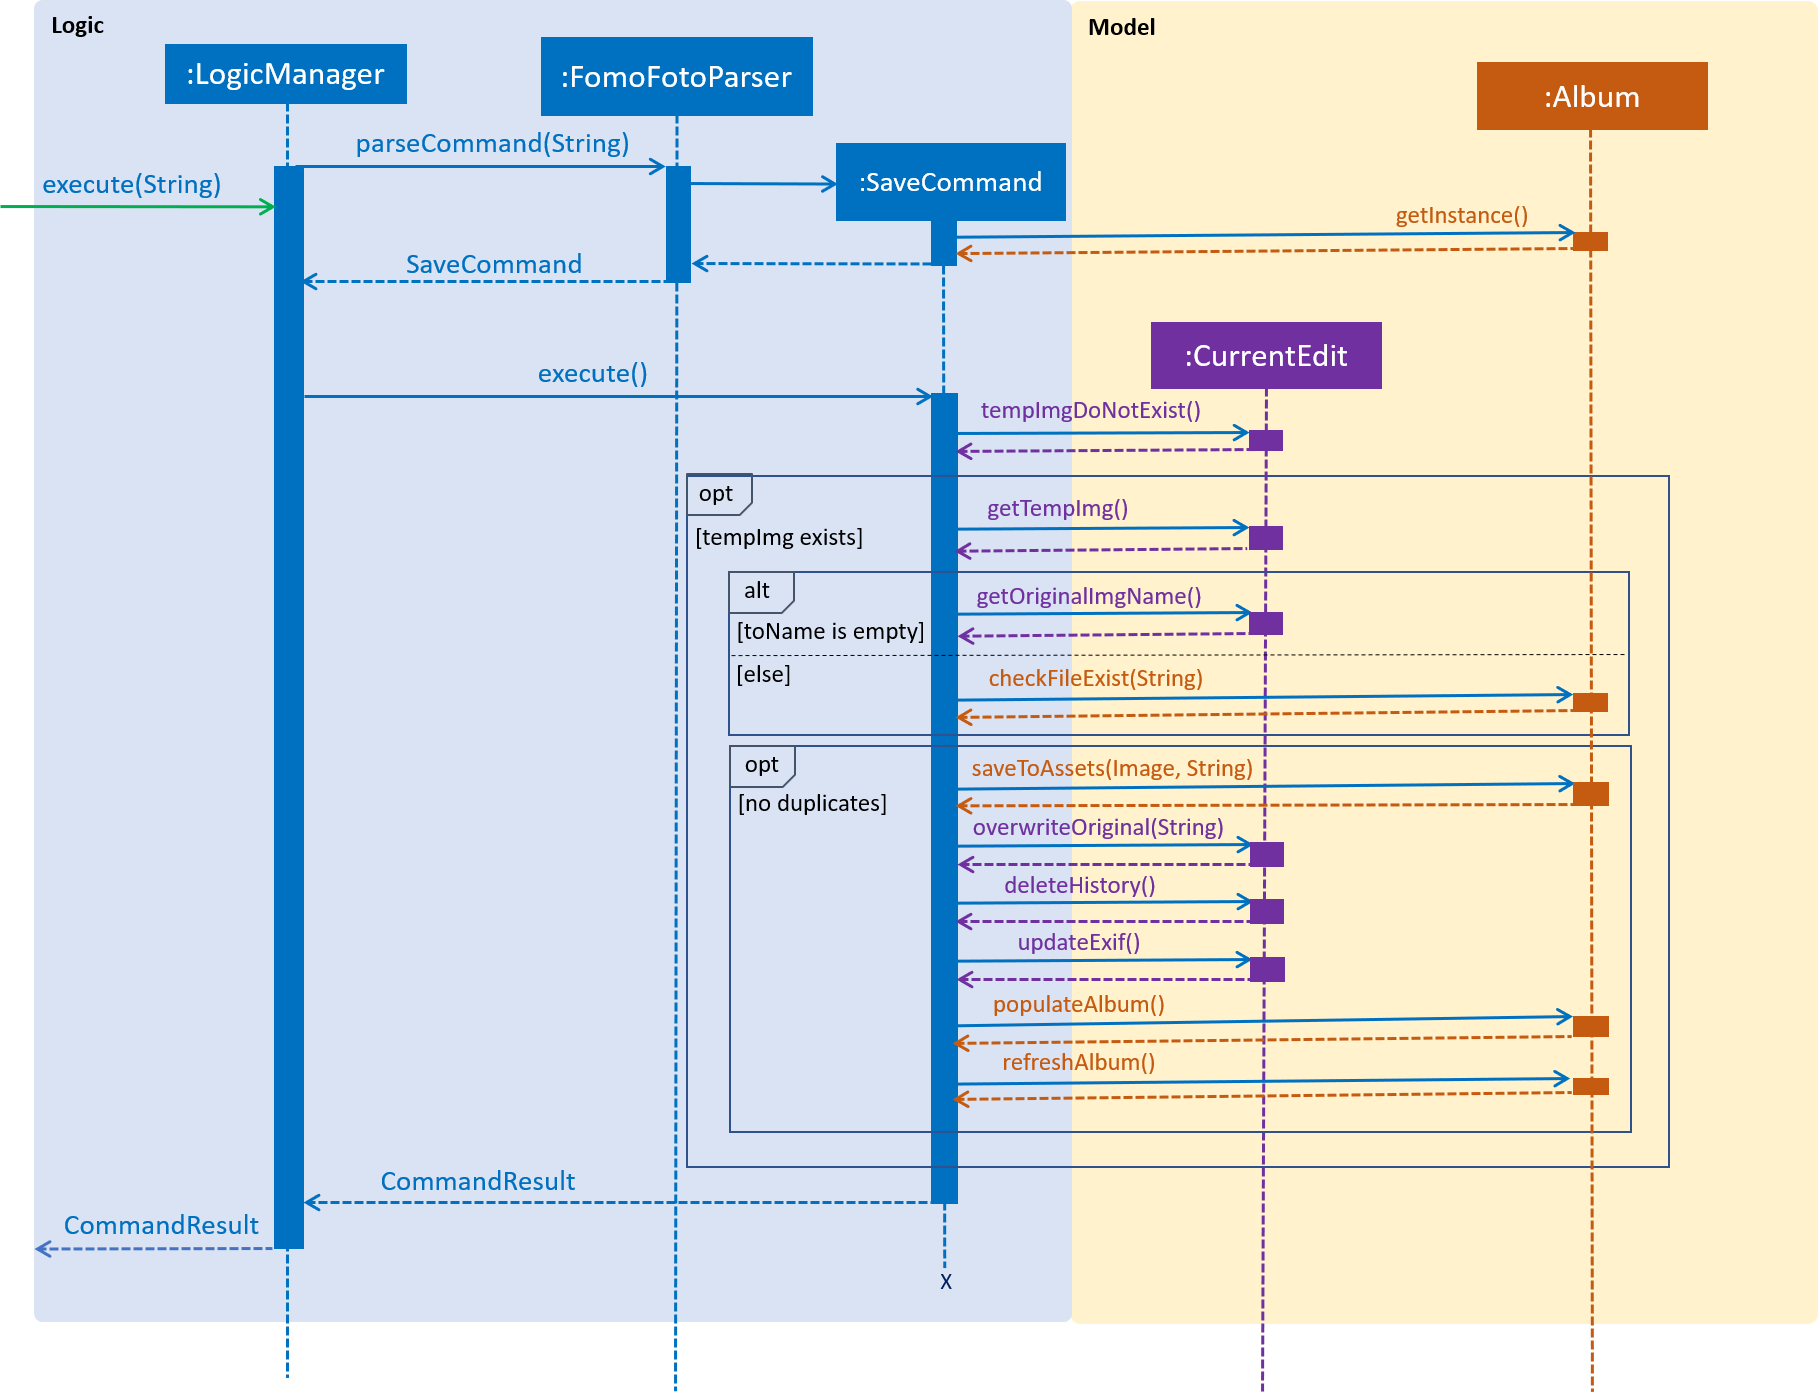
The following is an example usage scenario of how save behaves at each step as shown in the figure above.
Step 1. The user executes save.
Step 2. CurrentEdit#tempImageDoNotExist() is called to check if an image was previously opened. If open was not called previously, CommandException is thrown.
Step 3. CurrentEdit#getTempImage() is called to retrieve the tempImage from CurrentEdit.
Step 4. If the user did not input a String after save previously, CurrentEdit#getOriginalName() will retrieve the originalImageName from CurrentEdit. Otherwise, Album#checkFileExist(String) will be called to check if a file name is similar to String. If it is a duplicate, CommandException will be thrown.
Step 5. Album#saveToAssets(Image, String) takes in the previously retrieved Image and String to create a new image file in assets directory.
Step 6. CurrentEdit#overwriteOriginal(String) is called to update the files in temp directory and their respective instances in CurrentEdit.
Step 7. CurrentEdit#deleteHistory() is called to delete the edit history in CurrentEdit so that the user can no longer perform undo on the saved image.
Step 8.CurrentEdit#updateExif() is called to update the Exif data of the new image.
Step 9. Album#populateAlbum() is called to update the list of images in the Album class and to ensure it reflects all the files in the assets directory.
Step 10.Album#refreshAlbum() is called to update the Information Panel on the GUI.
3.7.2. Design Considerations
-
Alternative 1: The user must give a name to the new image.
-
Advantage: Name of the new image is clear to the user.
-
Disadvantage: May be tedious for the user to type in a name each time
saveis performed.
-
-
Alternative 2 (current choice): The user can choose to save as a new name or overwrite the original image
-
Advantage: Convenient for the user to
savequickly without having to type a new name every time. -
Disadvantage: The user may unintentionally overwrite the original image.
-
Alternative 2 was chosen as the user is likely to use save frequently. Since the assets directory functions like an album, images can be re-imported if they are accidentally overwritten. The user is able to save easily and choose to resume editing immediately or at a later time.
3.8. SavePreset Feature
This feature saves a list of commands that were applied to the opened image under a specified name so that they can be applied to other images in the future.
3.8.1. Current Implementation
The savepreset function is facilitated by CurrentEdit and TransformationSet. It uses the following operations:
-
CurrentEdit#tempImageDoNotExist()- ReturnstrueiftempImageinCurrentEditis null.tempImageis null only ifopencommand is never called. -
CurrentEdit#getTempSubHistory()- Retrieves theList<Command>from thetempImageinCurrentEdit. -
TransformationSet#isPresent(String)- Returns true if there is already aList<Command>saved under the same preset name. -
TransformationSet#addTransformation(String, List<Command>)- Saves theList<Command>to thetransformationMapinTransformationSetunder the specified preset name.
The following sequence diagram shows how savepreset works:
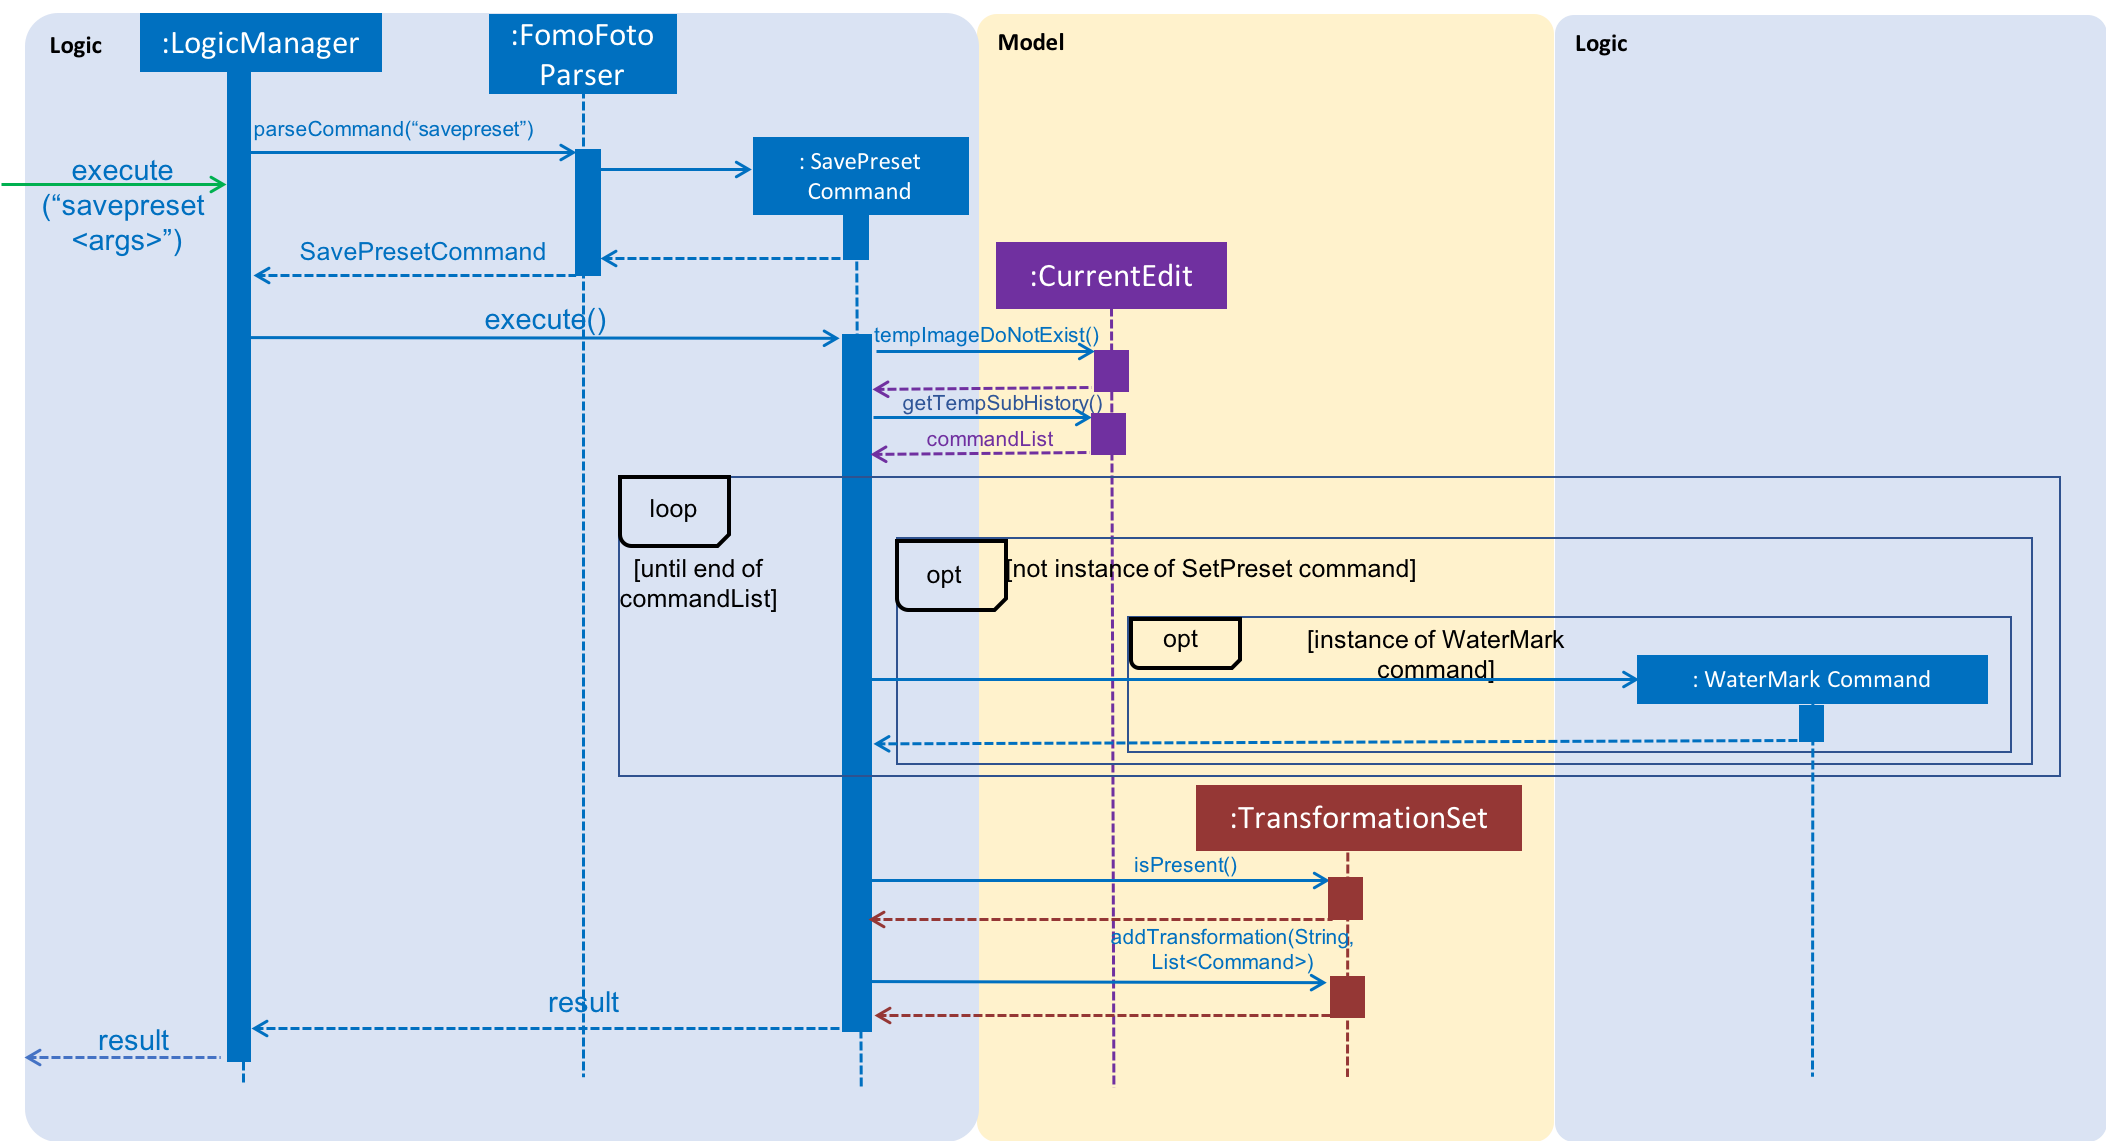
Given below is an example usage scenario of how savepreset behaves at each step as shown in Figure 18, “Sequence Diagram for Save Preset Command”.
Step 1. When the user enters the command (e.g. savepreset preset1), the entered command is parsed and the command will be executed.
| If an invalid command is provided, a reminder of how to use the command will be given to the user and no command will be executed. |
Step 2. During execution, the execute method in the SavePresetCommand class first invokes CurrentEdit#tempImageDoNotExist to check if an image is opened. If no image is opened, an error message will be displayed to remind the user to open an image for editing first.
Step 3. If an image is opened, the execute method will invoke CurrentEdit#getTempSubHistory() to retrieve the List<Command> from the tempImage in CurrentEdit which consists of the image editing commands used on the opened image.
Step 4. If the List<Command> is empty, an error message will be displayed to indicate that the opened image is not edited yet and thus there are no commands to be saved as a preset.
Step 5. TransformationSet#isPresent(String) is then invoked to check if the preset name specified by the user is used previously. If it is used previously, an error message will be displayed to tell the user to specify a different preset name.
Step 6. Lastly, the method TransformationSet#addTransformation(String, List<Command>) is called to add the List<Command in the TransformationSet, saving it as a preset of commands that can be used in the future with the setpreset command.
3.8.2. Design Considerations
-
Alternative 1 (current choice): The user can only save a preset of commands after applying these edits on an opened image.
-
Pros: The user can view the effects of the commands on an image first before deciding to save it as a preset.
-
Cons: It might be inconvenient for users who already have the list of commands they want to save as a preset beforehand and do not have to test them out.
-
-
Alternative 2: The user can save a preset of commands by typing out all the commands in a row without testing them on an image.
-
Pros: It will be convenient for professional editors as they do not have to test the commands out on an opened image first.
-
Cons: Beginners in image editing will have a hard time finding the right commands to save as a preset without testing them out first.
-
In the end, the first alternative is chosen for this application because our photo editor, FomoFoto, is mainly designed for basic photo editing and thus should be more suitable for beginners to use.
3.9. SetPreset Feature
This feature applies a preset list of commands that were saved previously using the setpreset command on the opened image.
3.9.1. Current Implementation
The setpreset function is facilitated by CurrentEdit and TransformationSet. It uses the following operations:
-
CurrentEdit#addCommand(Command)- Adds this command to the edit history [List<Command>] intempImagefor theundo/redocommand. -
CurrentEdit#displayTempImage()- Displays the temporary image stored in the temporary directory. -
CurrentEdit#getTempImage()- Retrieves the temporary imagetempImagewhich stores the filepath of the temporary image, its history of edits [List<Command>] and its metadata. -
CurrentEdit#replaceTempWithOriginal()- Replaces the temporary image in the filepath of thetempImagewith the original image. -
CurrentEdit#tempImageDoNotExist()- ReturnstrueiftempImageinCurrentEditis null.tempImageis null only ifopencommand is never called. -
TransformationSet#findTransformation(String)- Retrieves theList<Command>in thetransformationMapwith the specified preset name. -
TransformationSet#hasWaterMarkCommand(String)- Returns true if theList<Command>contains aWaterMarkCommand. -
TransformationSet#isPresent(String)- Returns true if there is aList<Command>saved under the given preset name.
The following sequence diagram shows how setpreset works:
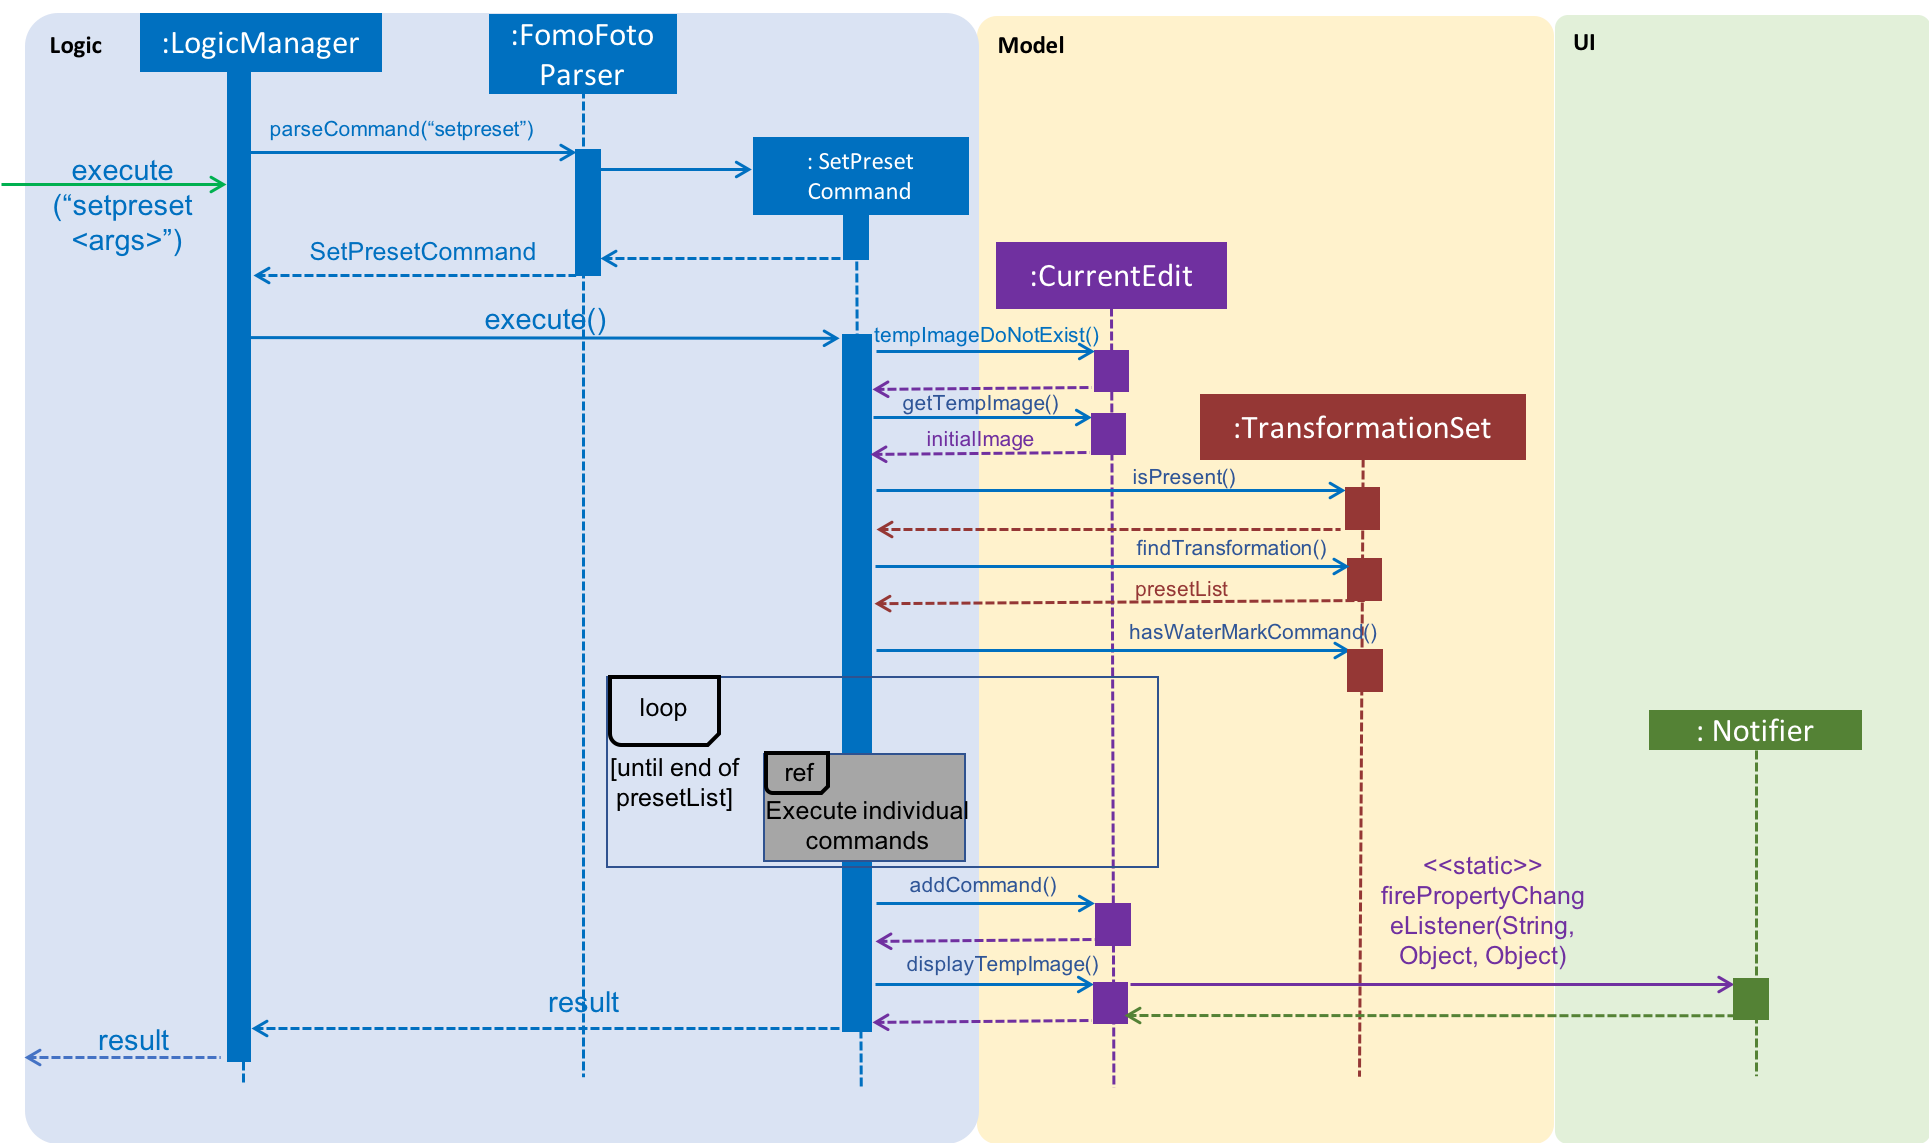
Given below is an example usage scenario of how setpreset behaves at each step as shown in Figure 19, “Sequence Diagram for Set Preset Command”.
Step 1. When the user enters the command (e.g. setpreset preset1), the entered command is parsed and the command will be executed.
| If an invalid command is provided, a reminder of how to use the command will be given to the user and no command will be executed. |
Step 2. During execution, the execute method in the SetPresetCommand class first invokes CurrentEdit#tempImageDoNotExist to check if an image is opened. If no image is opened, an error message will be displayed to remind the user to open an image for editing first.
Step 3. If an image is opened, the execute method will invoke CurrentEdit#getTempImage() to retrieve the tempImage from CurrentEdit.
Step 4. TransformationSet#isPresent(String) is then invoked to check if there is a preset of commands saved under the name specified by the user. If the method returns false, an error message will be displayed to inform the user that there is no preset of commands saved under the name he/she specified.
Step 5. Else, the method TransformationSet#findTransformation(String) is called to retrieve the List<Command> saved under the specified preset name. TransformationSet#hasWaterMarkCommand(String) is also invoked to check if the List<Command> has a WaterMarkCommand.
Step 6. Commands in the List<Command> will be executed one by one to apply the respective edits to the opened image. If any of the commands throws an exception (e.g. If a watermark is already applied on an image, the execution of a preset of commands which contains a WaterMarkCommand on the same image will throw an error message to indicate that there is already a watermark.), the method CurrentEdit#replaceTempWithOriginal will undo all the changes made to the image.
Step 6. Lastly, CurrentEdit#addCommand(this) is invoked to add this command to the List<Command> in tempImage for the undo/redo function and CurrentEdit#displayTempImage() is used to display the edited image on the graphical user interface.
3.9.2. Design Considerations
-
Alternative 1 (current choice): Allows user to apply the preset of commands on only one image (the image that is opened) at each time.
-
Pros: The user will be able to see the immediate effect of the commands on the image.
-
Cons: The user has to set the preset of commands on different images one by one which takes a longer time.
-
-
Alternative 2: Allows user to apply the preset of commands on multiple images.
-
Pros: The user can save time by applying the commands on many images in just one command instead of having to do it one by one.
-
Cons: The effects of the commands on the images are not shown immediately to the user and user will not be able to determine if the preset of commands is suitable for each of the images.
-
In the end, the first alternative is chosen as we want users to see the immediate effect of the commands so that they can make changes or undo the edits if they do not like what they see.
3.10. Undo/Redo feature
3.10.1. Current Implementation
The undo/redo mechanism is facilitated by Image. It contains a list of commands applied to the current image. Additionally, it implements the following operations:
-
Image#addHistory()— Saves the current edit command into commandHistory list and increments index. -
Image#setUndo()— Decreases index by 1. -
Image#setRedo()— Increases index by 1. -
Image#getHistory()— Returns commandHistory as List. -
Image#getSubHistory()— Returns commandHistory sublist using index to track which commands should be included. -
Image#canUndo()— Returns true if index > 0. -
Image#canRedo()— Returns true if index < CommandHistory.size().
These operations are exposed in the CurrentEdit interface as CurrentEdit#addCommand(), CurrentEdit#setUndoTemp(), CurrentEdit#setRedoTemp(), CurrentEdit#getHistoryTemp(), CurrentEdit#getSubHistoryTemp(), CurrentEdit#canUndoTemp() and CurrentEdit#canRedoTemp() respectively.
Given below is an example usage scenario and how the undo/redo mechanism behaves at each step.
Step 1. The user opens an image. The Image will be initialized with an empty commandHistory List.

Step 2. The user executes a series of transformations on the image. These transformations are stored in the commandHistory list and for each transformation stored, the index is incremented by 1 to point to that transformation.
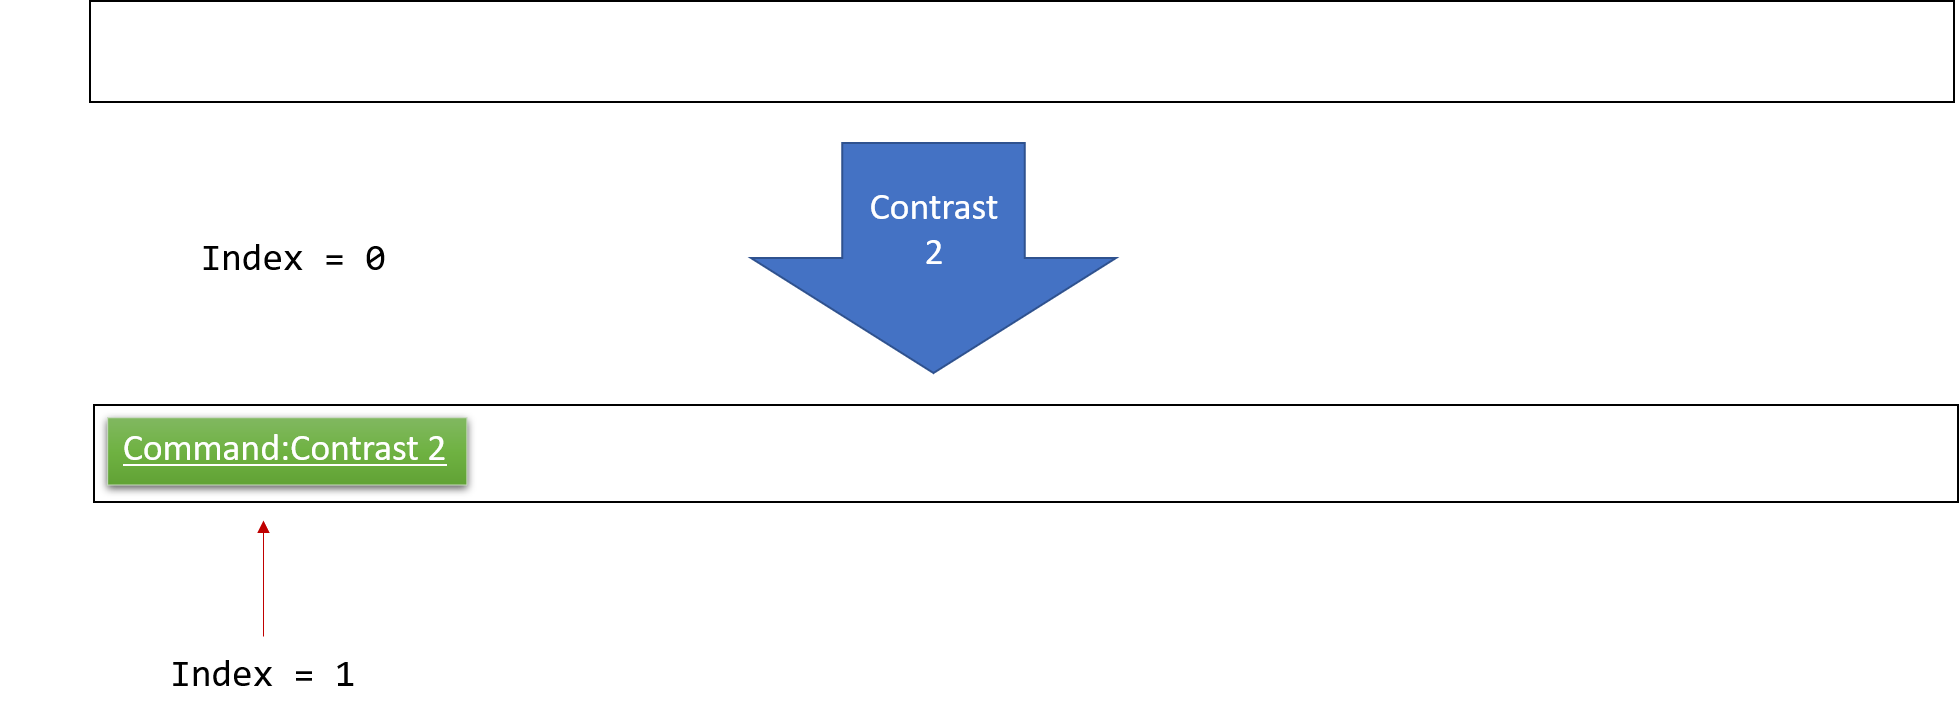
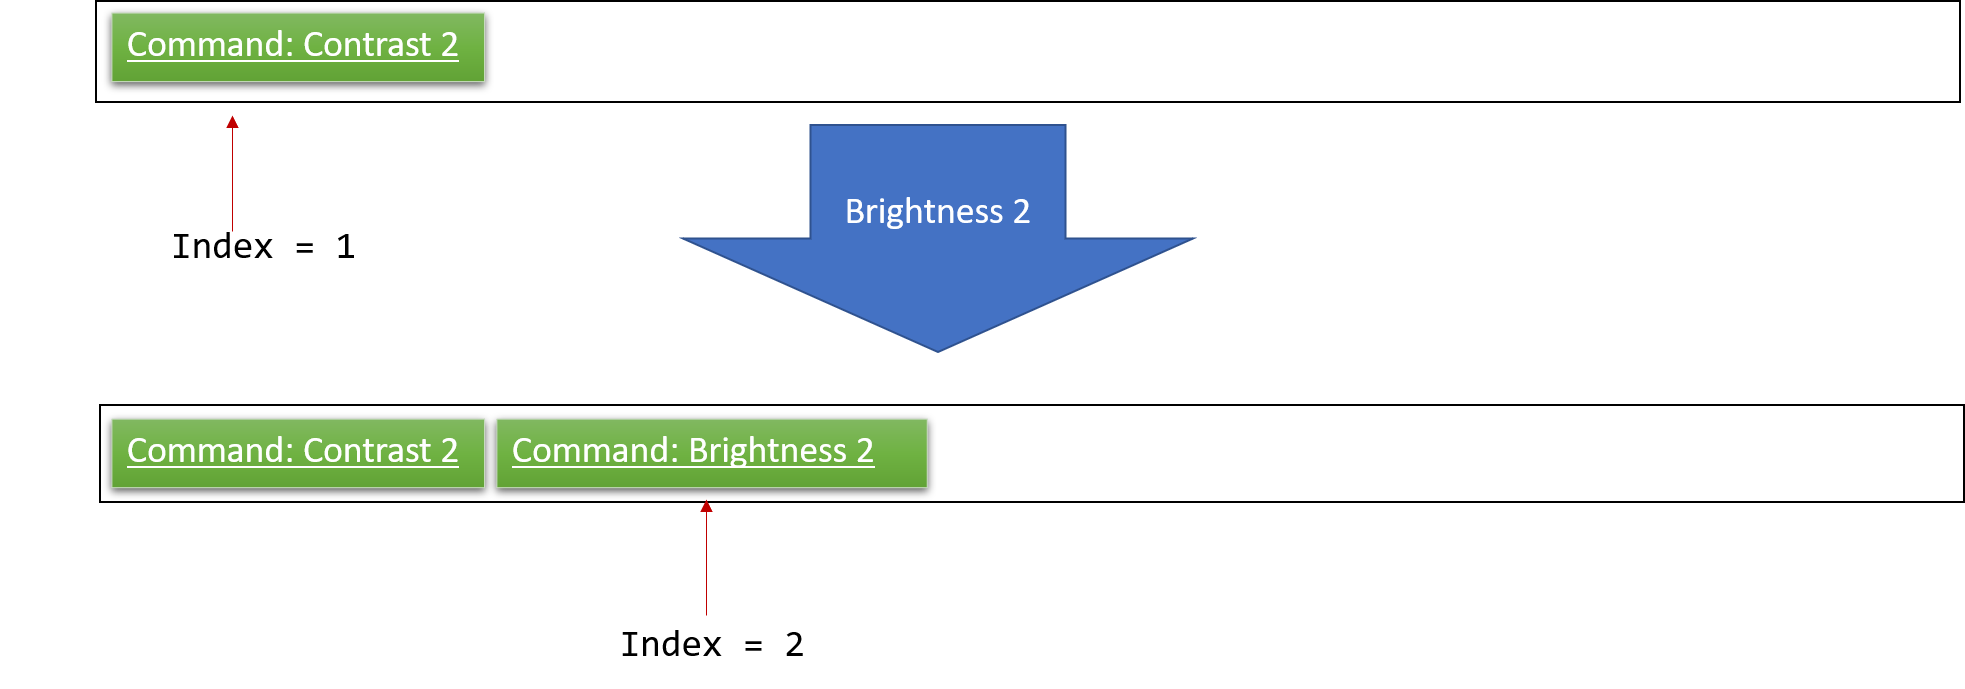
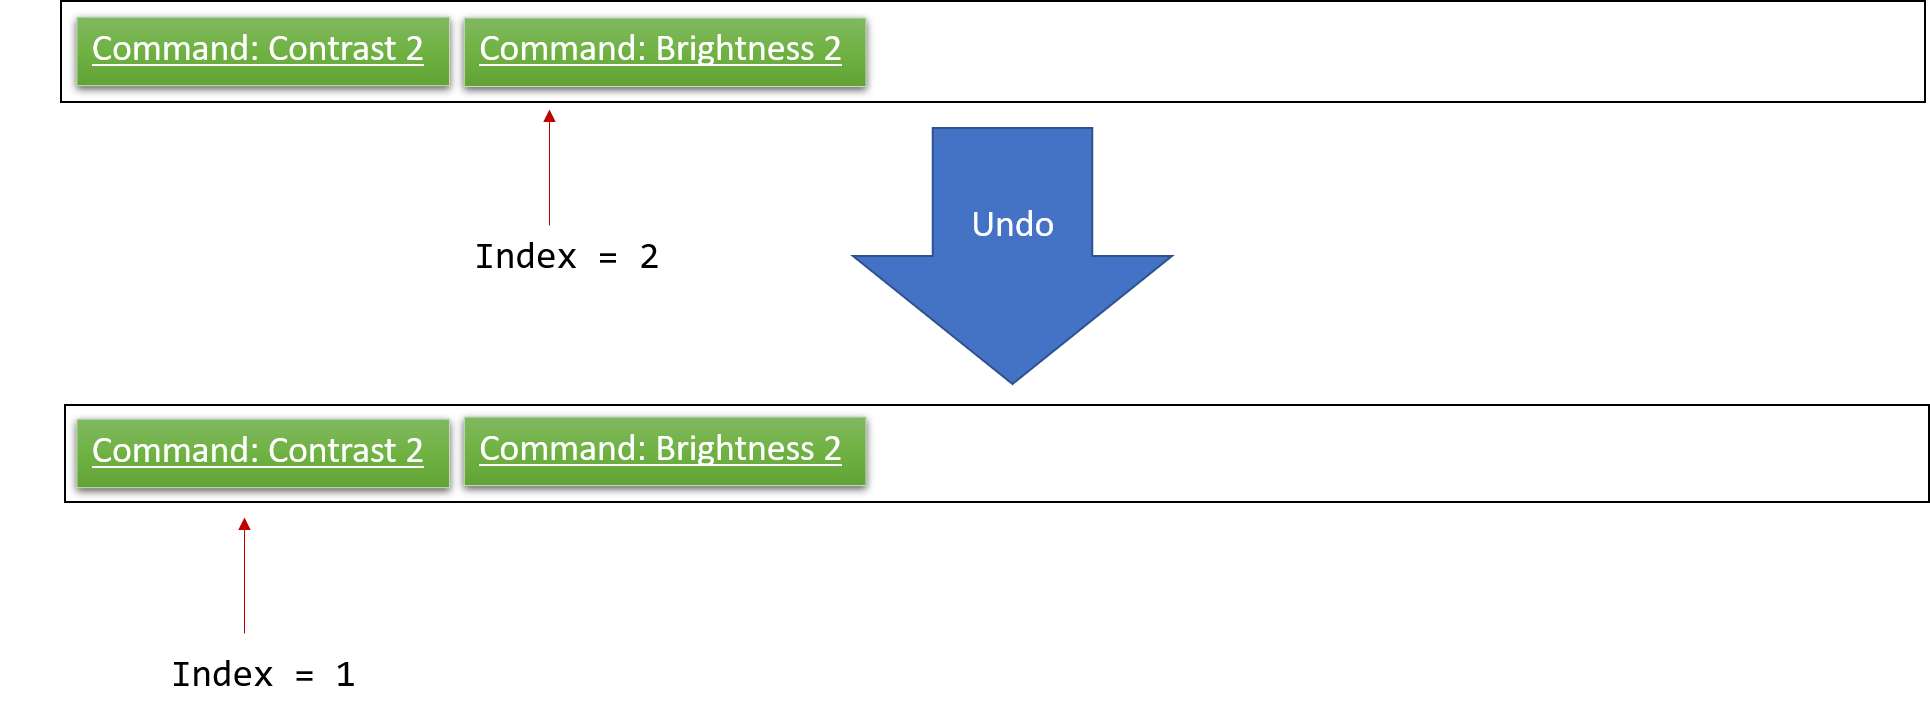
Step 3. The user wants to undo the previous transformation by using the undo command. It will call CurrentEdit#replaceTempWithOriginal() which will replace the edited image in temp folder with the original image. It will then call CurrentEdit#setUndoTemp() to set the index in tempImage to the required index and retrieve the list with CurrentEdit#getHistoryTemp(). Using the list, it will apply the commands onto the original image until it reaches the command just before the set index.
| If a command fails its execution, it will return the image before undo was called and produce an error message. |
Step 4. After executing Undo, index will be less than the size of commandHistory. If redo is not executed before a new command is added, all commands in the list after index will be deleted.
For redo, it will call setRedo and retrieve that command to apply it on the current image.
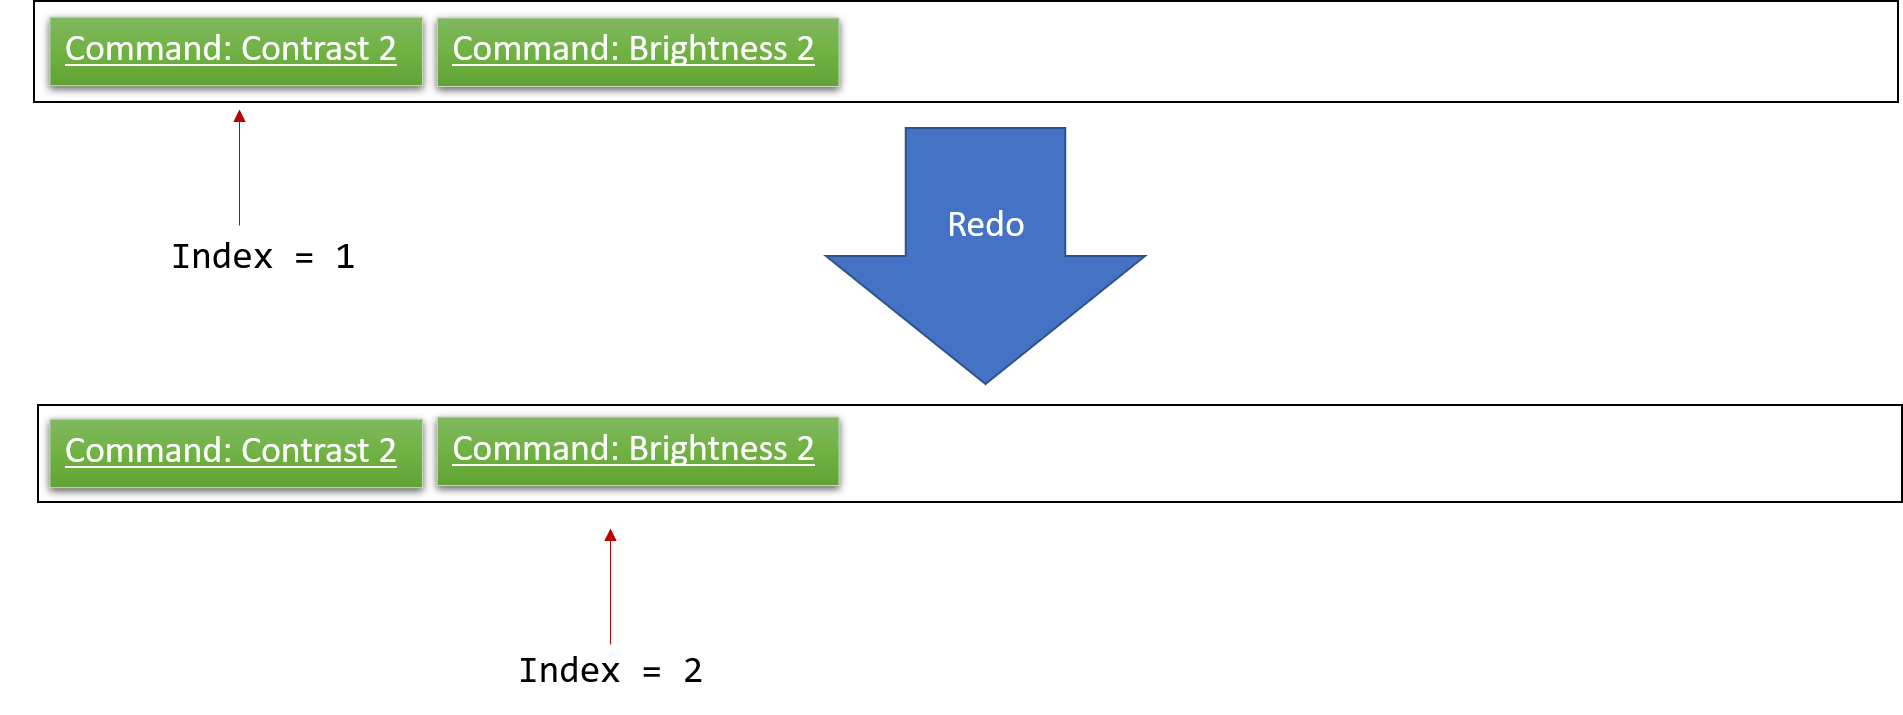
If the Image#index is 0, pointing to the initial image, then there are no previous commands to restore. The undo command uses CurrentEdit#canUndoTemp() to check if this is the case. If so, it will return an error to the user rather than attempting to perform the undo.
|
The following sequence diagram shows how the undo operation works:
The redo command does the opposite — it calls CurrentEdit#setRedoTemp(), which shifts the index once to the right, pointing to the previously undone command, and executes that command to perform the transformation.
If the index is at index commandHistory.size(), pointing to the latest image state, then there is no undone transformation to restore. The redo command uses CurrentEdit#canRedoTemp() to check if this is the case. If so, it will return an error to the user rather than attempting to perform the redo.
|
Step 5. The user executes saves, which calls CurrentEdit#saveToAssets(). This replaces the original image with the temp image since a name is not specified. When this happens, the user can no longer call undo as there is no original image to work on. The command history is also cleared.
3.10.2. Design Considerations
Aspect: How undo & redo executes
-
Alternative 1: Saves each transformation as a separate image.
-
Pros: Easy to implement.
-
Cons: May have performance issues in terms of memory usage.
-
-
Alternative 2(current choice): Save all transformation in a list and apply them when undo/redo is called. We chose this method as we do not want our application to take up too much space in the PC.
-
Pros: Will use less memory
-
Cons: We must ensure that the implementation of each individual command is correct.
-
Aspect: Data structure to support the undo/redo commands
-
Alternative 1 (current choice): Use a list to store the history of commands. We chose this so as to preserve good object-oriented programming principles.
-
Pros: Easy for new computer science student undergraduates to understand, who are likely to be the new incoming developers of our project.
-
Cons: Logic is duplicated twice. For example, when a new command is executed, we must remember to update both
HistoryManagerandImage.
-
-
Alternative 2: Use
HistoryManagerfor undo/redo-
Pros: We do not need to maintain a separate list, and just reuse what is already in the codebase.
-
Cons: Requires dealing with commands that have already been undone: We must remember to skip these commands. Violates single responsibility principle and separation of concerns as
HistoryManagernow needs to do two different things.
-
3.11. WaterMark Feature
This command allows the user to add a watermark to their image. Upon receiving an input message from the user, the message will be checked for its validity and will throw an error if the message is empty or contains only spaces. Messages can contain words and numbers separated by spaces. The command will then be added to the List<Commands> belonging to tempImage found in currentEdit which saves the editing history of the targeted image.
Each image can only have 1 watermark. If the user would like to edit the watermark, the user can remove the watermark by using the Undo function and then add a new watermark.
|
3.11.1. Current Implementation
The manipulation feature is facilitated by CurrentEdit and Image. It uses the following operations:
-
CurrentEdit#tempImageDoNotExist()- ReturnstrueiftempImageinCurrentEditis null.tempImageis null only ifopencommand is never called. -
CurrentEdit#getTempImage- Retrieves the temporary imagetempImagewhich stores the filepath of the temporary image in thetempdirectory, its history of edits [List<Command>] and its metadata. -
CurrentEdit#updateTempImage- Replaces the temporary image intempdirectory with the newly edited image and updates thetempImageinstance in the class. -
CurrentEdit#addCommand- Adds this command to the edit historyList<Command>intempImagefor theundo/redocommand. -
CurrentEdit#displayTempImage()- Displays the temporary image stored in thetempdirectory. -
Image#hasWaterMark()- Checks if theImagealready has a watermark. -
Image#setWaterMark(boolean)- Sets theImageobject’shasWaterMarkfield accordingly - if theImageobject has or does not have a watermark.
The diagram below illustrates how the WaterMark Command works:
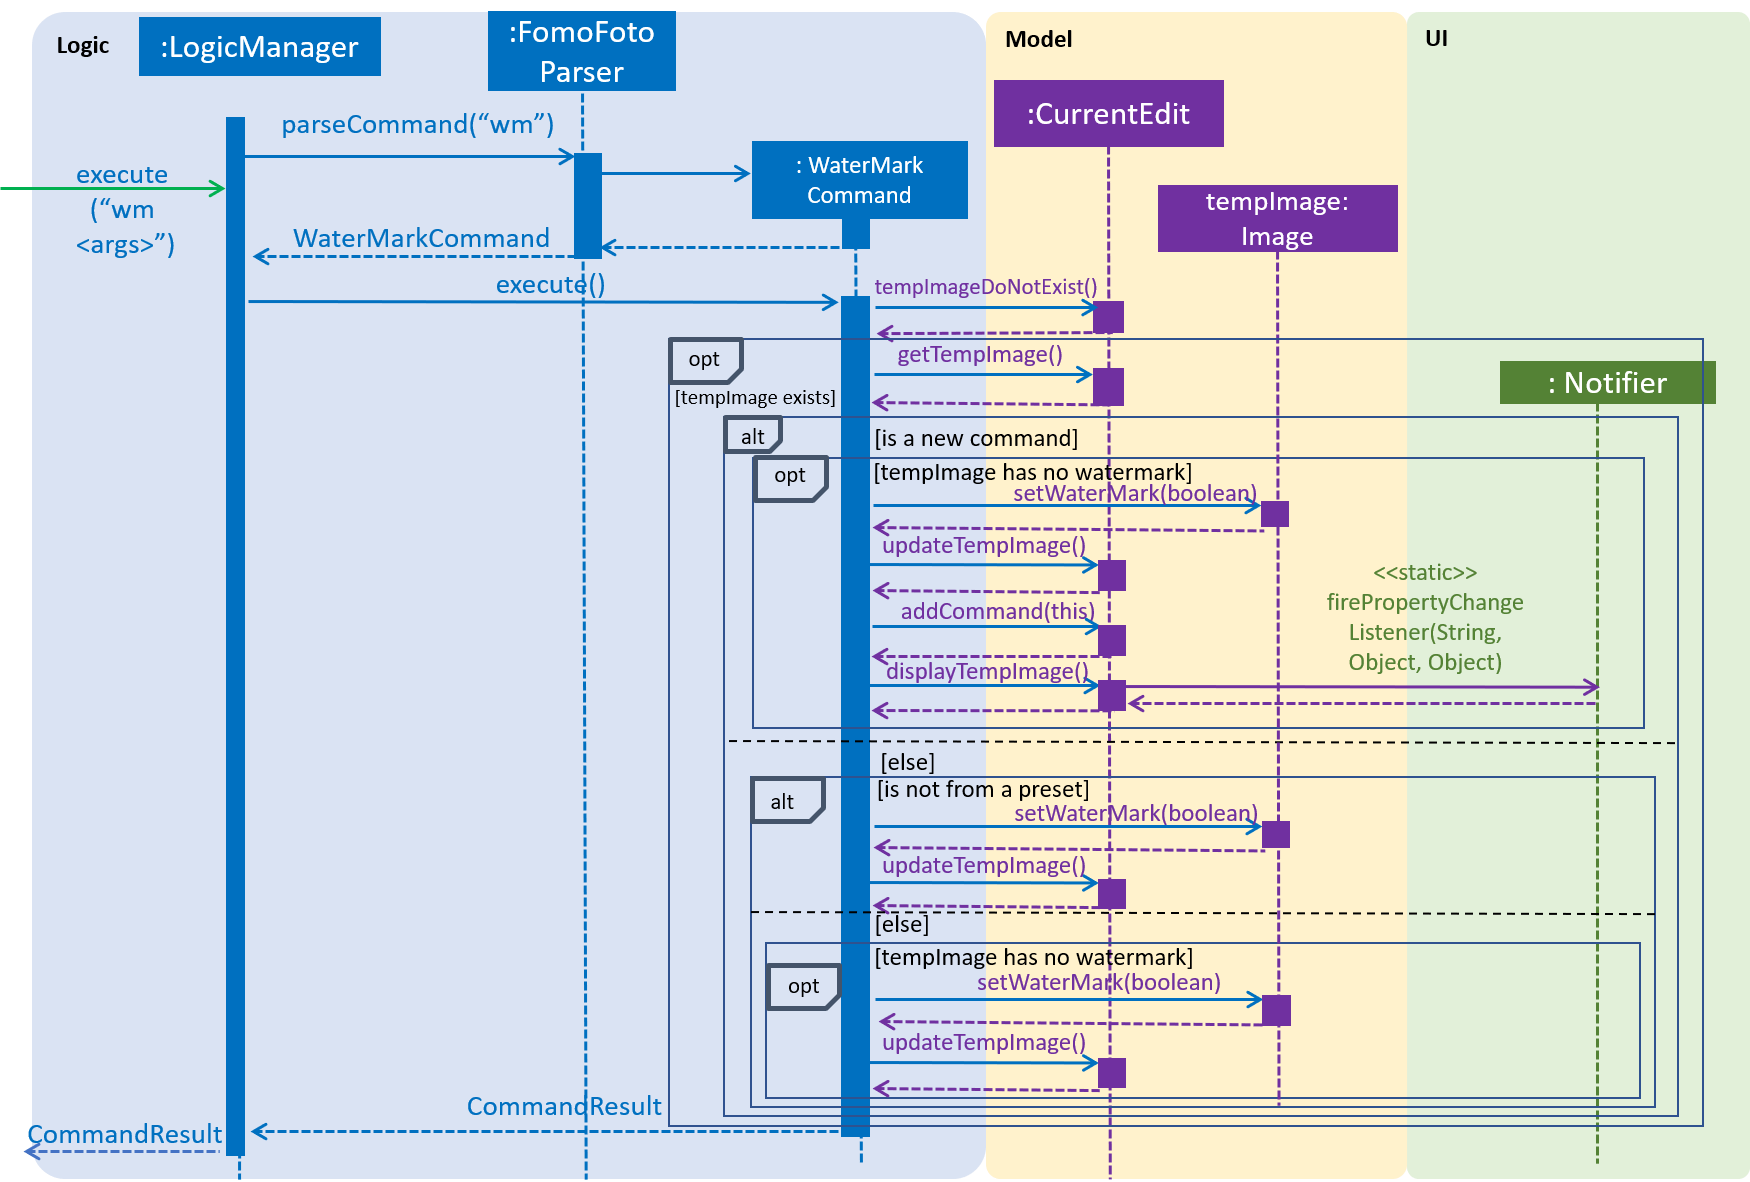
Given below is an example usage scenario and how the command should behave at each step:
Step 1. When the user runs an open command to edit an image, it invokes a method which creates an instance of an Image that stores the file path of the image, its history of edits List<Command> and its metadata. This Image object is saved under the variable name tempImage in currentEdit for editing.
Step 2. When the user enters the command (e.g. wm FomoFoto), the entered command is parsed and the command will be executed.
| If an invalid command is provided, a reminder of how to use the command will be given to the user and no command will be executed. |
Step 3. During execution, the execute method in the WaterMarkCommand class first invokes currentEdit#tempImageDoNotExist to check if an image is opened. If no image is opened, it will throw an error message to inform the user to open an image for editing. Else, the execute method will invoke currentEdit#getTempImage() to get the tempImage from CurrentEdit.
Step 4. Upon retrieving the tempImage, the execute method in the WaterMarkCommand gets the BufferedImage instance of the tempImage object and copies the BufferedImage object to a temporary BufferedImage object with the same width, height and image type. The execute method then initialises the necessary graphics properties using the Graphics2D Java class. The message is centralised and overlays the temporary BufferedImage object.
Step 5. The execute method then checks for a few conditions listed below:
-
isNewCommand: Checks if theWaterMarkcommand is from an input by the user, from anundo/redocommand or from aSetPresetcommand. -
isPreset: Checks if theWaterMarkcommand is from a preset. -
tempImage#hasWaterMark(): Checks if thetempImagealready has a watermark.
Step 6. According to the above 3 conditions, the following combinations will result in different actions:
-
isNewCommand=TrueandtempImage#hasWaterMark()=False:-
Invokes
tempImage#setWaterMark(True)to indicate that the image has a watermark. -
Invokes
currentEdit#updateTempImage()to save the newly editedBufferedImageand replace the previous image in the filepath of thetempImage. -
Sets
isNewCommandto false to signal that this command is not a new rotate command if it is executed again through theundo/redofunction. -
Invokes
currentEdit#addCommand(this)to add this command to theList<Command>intempImagefor theundo/redofunction andcurrentEdit#displayTempImage()is used to display the edited image on the graphical user interface.
-
-
isNewCommand=TrueandtempImage#hasWaterMark()=True:-
Throws an exception as there is already a watermark on
tempImage.
-
-
isNewCommand=FalseandisPreset=False:-
Indicates that it is an
undo/redofunction. -
Invokes
tempImage#setWaterMark(true)to indicate that the image has a watermark. -
Invokes
currentEdit#updateTempImage()to save the newly editedBufferedImageand replace the previous image in the filepath of thetempImage.
-
-
isNewCommand=FalseandisPreset=TrueandtempImage#hasWaterMark()=False:-
Indicates that a preset is added to an image with no watermark.
-
Invokes
tempImage#setWaterMark(true)to indicate that the image has a watermark. -
Invokes
currentEdit#updateTempImage()to save the newly editedBufferedImageand replace the previous image in the filepath of thetempImage.
-
-
Anything else:
-
Throws an exception as there is already a watermark on
tempImage.
-
3.11.2. Design Considerations
-
Images that are still being edited have to be stored and edited in a temp directory first due to our
undo/redoimplementation.
3.12. Logging
We are using java.util.logging package for logging. The LogsCenter class is used to manage the logging levels and logging destinations.
-
The logging level can be controlled using the
logLevelsetting in the configuration file (See [Implementation-Configuration]) -
The
Loggerfor a class can be obtained usingLogsCenter.getLogger(Class)which will log messages according to the specified logging level -
Currently log messages are output through:
Consoleand to a.logfile.
Logging Levels
-
SEVERE: Critical problem detected which may possibly cause the termination of the application -
WARNING: Can continue, but with caution -
INFO: Information showing the noteworthy actions by the App -
FINE: Details that are not usually noteworthy but may be useful in debugging e.g. print the actual list instead of just its size
4. Documentation
We use asciidoc for writing documentation.
| We chose asciidoc over Markdown because asciidoc, although a bit more complex than Markdown, provides more flexibility in formatting. |
4.1. Editing Documentation
See UsingGradle.adoc to learn how to render .adoc files locally to preview the end result of your edits.
Alternatively, you can download the AsciiDoc plugin for IntelliJ, which allows you to preview the changes you have made to your .adoc files in real-time.
4.2. Publishing Documentation
See UsingTravis.adoc to learn how to deploy GitHub Pages using Travis.
4.3. Converting Documentation to PDF format
We use Google Chrome for converting documentation to PDF format, as Chrome’s PDF engine preserves hyperlinks used in webpages.
Here are the steps to convert the project documentation files to PDF format.
-
Follow the instructions in UsingGradle.adoc to convert the AsciiDoc files in the
docs/directory to HTML format. -
Go to your generated HTML files in the
build/docsdirectory, right click on them and selectOpen with→Google Chrome. -
Within Chrome, click on the
Printoption in Chrome’s menu. -
Set the destination to
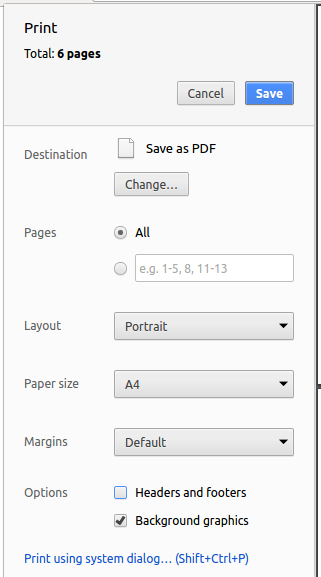
Save as PDF, then clickSaveto save a copy of the file in PDF format. For best results, use the settings indicated in the screenshot below.
4.4. Site-wide Documentation Settings
The build.gradle file specifies some project-specific asciidoc attributes which affects how all documentation files within this project are rendered.
Attributes left unset in the build.gradle file will use their default value, if any.
|
| Attribute name | Description | Default value |
|---|---|---|
|
The name of the website. If set, the name will be displayed near the top of the page. |
not set |
|
URL to the site’s repository on GitHub. Setting this will add a "View on GitHub" link in the navigation bar. |
not set |
|
Define this attribute if the project is an official SE-EDU project. This will render the SE-EDU navigation bar at the top of the page, and add some SE-EDU-specific navigation items. |
not set |
4.5. Per-file Documentation Settings
Each .adoc file may also specify some file-specific asciidoc attributes which affects how the file is rendered.
Asciidoctor’s built-in attributes may be specified and used as well.
Attributes left unset in .adoc files will use their default value, if any.
|
| Attribute name | Description | Default value |
|---|---|---|
|
Site section that the document belongs to.
This will cause the associated item in the navigation bar to be highlighted.
One of: * Official SE-EDU projects only |
not set |
|
Set this attribute to remove the site navigation bar. |
not set |
4.6. Site Template
The files in docs/stylesheets are the CSS stylesheets of the site.
You can modify them to change some properties of the site’s design.
The files in docs/templates controls the rendering of .adoc files into HTML5.
These template files are written in a mixture of Ruby and Slim.
|
Modifying the template files in |
5. Testing
5.1. Running Tests
There are three ways to run tests.
| The most reliable way to run tests is the 3rd one. The first two methods might fail some GUI tests due to platform/resolution-specific idiosyncrasies. |
Method 1: Using IntelliJ JUnit test runner
-
To run all tests, right-click on the
src/test/javadirectory and chooseRun 'All Tests' -
To run a subset of tests, you can right-click on a test package, test class, or a test and choose
Run 'ABC'
Method 2: Using Gradle
-
Open a console and run the command
gradlew clean allTests(Mac/Linux:./gradlew clean allTests)
| See UsingGradle.adoc for more info on how to run tests using Gradle. |
Method 3: Using Gradle (headless)
Thanks to the TestFX library we use, our GUI tests can be run in the headless mode. In the headless mode, GUI tests do not show up on the screen. That means the developer can do other things on the Computer while the tests are running.
To run tests in headless mode, open a console and run the command gradlew clean headless allTests (Mac/Linux: ./gradlew clean headless allTests)
5.2. Types of tests
We have two types of tests:
-
GUI Tests - These are tests involving the GUI. They include,
-
System Tests that test the entire App by simulating user actions on the GUI. These are in the
systemtestspackage. -
Unit tests that test the individual components. These are in
seedu.address.uipackage.
-
-
Non-GUI Tests - These are tests not involving the GUI. They include,
-
Unit tests targeting the lowest level methods/classes.
e.g.seedu.address.commons.StringUtilTest -
Integration tests that are checking the integration of multiple code units (those code units are assumed to be working).
e.g.seedu.address.storage.StorageManagerTest -
Hybrids of unit and integration tests. These test are checking multiple code units as well as how the are connected together.
e.g.seedu.address.logic.LogicManagerTest
-
5.3. Troubleshooting Testing
Problem: HelpWindowTest fails with a NullPointerException.
-
Reason: One of its dependencies,
HelpWindow.htmlinsrc/main/resources/docsis missing. -
Solution: Execute Gradle task
processResources.
6. Dev Ops
6.1. Build Automation
See UsingGradle.adoc to learn how to use Gradle for build automation.
6.2. Continuous Integration
We use Travis CI and AppVeyor to perform Continuous Integration on our projects. See UsingTravis.adoc and UsingAppVeyor.adoc for more details.
6.3. Coverage Reporting
We use Coveralls to track the code coverage of our projects. See UsingCoveralls.adoc for more details.
6.4. Documentation Previews
When a pull request has changes to asciidoc files, you can use Netlify to see a preview of how the HTML version of those asciidoc files will look like when the pull request is merged. See UsingNetlify.adoc for more details.
6.5. Making a Release
Here are the steps to create a new release.
-
Update the version number in
MainApp.java. -
Generate a JAR file using Gradle.
-
Tag the repo with the version number. e.g.
v0.1 -
Create a new release using GitHub and upload the JAR file you created.
6.6. Managing Dependencies
A project often depends on third-party libraries. For example, Address Book depends on the Jackson library for JSON parsing. Managing these dependencies can be automated using Gradle. For example, Gradle can download the dependencies automatically, which is better than these alternatives:
-
Include those libraries in the repo (this bloats the repo size)
-
Require developers to download those libraries manually (this creates extra work for developers)
Appendix A: Product Scope
Target user profile:
-
Needs a quick way to perform simple edits on images.
-
Needs to view tagged information on an image.
-
Prefer desktop apps over other types
-
Can type fast
-
Prefers typing over mouse input
-
Is reasonably comfortable using CLI apps
Value proposition: Edit photos quicker and more intuitively than a typical mouse/GUI driven app. Also provides an easy way to view tagged metadata on images.
Appendix B: User Stories
This section lists the user stories behind the features of our application.
Priorities:
-
* * *— High (must have) -
* *— Medium (nice to have) -
*— Low (unlikely to have)
| Priority | User Story | Feature Implemented |
|---|---|---|
|
As a new user, I want to see usage instructions so that I can refer to instructions when I forget how to use the application. |
|
|
As a user, I want to import my image so that I can store a copy of the image in the application. |
|
|
As a user, I want to open an image stored in the application for editing. |
|
|
As a user, I want to adjust the brightness of my image so that I can make it brighter or darker. |
|
|
As a user, I want to apply a black and white filter to my photo for aesthetics. |
|
|
As a user, I want to adjust the contrast of my image. |
|
|
As a user, I want to crop my image so that I can trim it into my desired dimensions. |
|
|
As a user, I want to resize my image. |
|
|
As a user, I want to rotate my image so that I can change its orientation. |
|
|
As a user, I want to undo and redo my edits so that I can revert or recover my changes. |
|
|
As a user, I want to save my image so that I can have a new image or continue editing it the future. |
|
|
As a user, I want to export my image so that I can save my edited images to my computer. |
|
|
As a frequent user, I want to create presets of edits so that I can easily apply a set of edits to my photos. |
|
|
As a user, I want to list the names of the images imported into the application so that I know what images are currently stored inside. |
|
Appendix C: Use Cases
Use case: View Image
-
User import an image.
-
User opens the image.
-
Image is displayed on GUI.
Use case ends.
Extensions
-
1a. The file path does not contain an image. FomoFoto throws an error message.
Use case ends.
-
2a. The image name does not exist in Album. FomoFoto throws an error message.
Use case ends.
C.1. Use case: View Metadata
-
User import an image.
-
User opens the image.
-
Image is displayed on GUI.
-
Switch tab to view Metadata.
Use case ends.
Extensions
-
1a. The file path does not contain an image. FomoFoto throws an error message.
Use case ends.
-
2a. The image name does not exist in Album. FomoFoto throws an error message.
Use case ends.
C.2. Use case: Edit Image
-
User import an image.
-
User opens the image.
-
Image is displayed on GUI.
-
User applies an image filter.
Use case ends.
Extensions
-
1a. The file path does not contain an image. FomoFoto throws an error message.
Use case ends.
-
2a. The image name does not exist in Album. FomoFoto throws an error message.
Use case ends.
-
4a. The arguments for filters are invalid. FomoFoto throws an error message.
Use case ends.
C.3. Use case: Export Image
-
User saves the image to Album.
-
User export image from Album.
Use case ends.
Extensions
-
1a. The image name does not exist in Album. FomoFoto throws an error message.
Use case ends.
-
2a. The file path for export is invalid. FomoFoto throws an error message.
Use case ends.
Appendix D: Non Functional Requirements
-
Should work on any mainstream OS as long as it has Java
9or higher installed. -
Should be able to hold up to 100 images without a noticeable sluggishness in performance for typical usage.
-
A user with above average typing speed for regular English text (i.e. not code, not system admin commands) should be able to accomplish most of the tasks faster using commands than using the mouse.
Appendix F: Instructions for Manual Testing
Given below are instructions to test the app manually.
| These instructions only provide a starting point for testers to work on; testers are expected to do more exploratory testing. |
F.1. Launch and Shutdown
-
Initial launch.
-
Download the jar file and copy into an empty directory.
-
Double-click the jar file
Expected: Shows the GUI with an empty Album. The window size may not be optimum.
-
-
Saving window preferences.
-
Resize the window to an optimum size. Move the window to a different location. Close the window.
-
Re-launch the app by double-clicking the jar file.
Expected: The most recent window size and the location is retained.
-
-
Shutdown and relaunch.
-
Shutdown the application by typing
exitor closing the window. -
Relaunch the jar file. Expected: Shows the GUI with any previously opened images in the Album.
-
F.2. Importing an image
-
Prerequisites: Given FILEPATH should be an image or a directory with images.
-
Import a sample list of images.
-
Enter
import sample
Expected: GUI should populate Album Images with a sample list of images.
-
-
Import a single image.
-
Enter
import FILEPATH
Expected: GUI should populate Album Images with an image from the indicated file path.
-
-
Import a directory.
-
Enter
import FILEPATH
Expected: GUI should populate Album Images with images from an indicated directory.
-
F.3. Opening an image
-
Prerequisites: An album should contain at least a single imported image.
-
Open an image from Album.
-
Enter
open IMAGE_NAME
Expected: GUI should open and display image from Album.
-
F.4. Editing an image
-
Prerequisites: An image should be opened.
-
Apply contrast on an opened image.
-
Enter
contrast
Expected: GUI should apply the edit to the opened image with default contrast value.
-
F.5. Undoing an edit
-
Prerequisites: An image should at least one edit applied to it.
-
Undo a previously applied edit.
-
Enter
undo
Expected: GUI should refresh the opened image to its previous state.
-
F.6. Saving an image
-
Prerequisites: An image should be opened.
-
Save an opened image.
-
Enter
save
Expected: GUI should save the currently opened image as an image in Album with the same name.
-
F.7. Export an image
-
Prerequisites: Given FILEPATH should be a valid, writable path. The Album should contain at least a single imported image.
-
Export an image from Album.
-
Enter
export f/IMAGE_NAME d/DIRECTORY_NAME
Expected: GUI should export the selected Album image to the target directory.
-