Overview
My team and I were tasked with enhancing a basic command line addressbook for our Software Engineering project. We decided to morph the project into an image editor.
FomoFoto is a robust yet simple image-editing tool. Users interact with the application through worded commands from their keyboard, and receive visual feedback from it through the displayed image on the application.
Unlike other heavy image editors, FomoFoto has a very gentle learning curve as it abstracts out clutter by providing the more essential features (complex editing can still be done with special commands). The features and implementations are well documented in guides for users and developers respectively.
In addition, FomoFoto is well maintained with high reliability and code quality as it is covered by rigorous tests and checks.
Summary of contributions
This section provides a summary of my coding, documentation and other contributions to FomoFoto, our team project.
-
Major enhancement: I added the ability to apply filters on images
-
What it does: This feature allows the user to apply filters on images by adjusting their contrast and brightness or transforming them into black and white images. Users can key in commands such as
contrast,brightnessandbwto apply the respective filters on images. Before our application executes the respective image filter commands, the arguments specified by the user will first be parsed and validated. -
Justification: This feature improves the product significantly because applying filters on images is an essential feature of an image editor. Users might need to adjust the brightness and contrast of images as the images they have might be under-exposed and are not well contrasted. Also, the black and white filter is useful for users who like vintage images.
-
Highlights: This enhancement was challenging to implement as the image filter commands are working on the same image as the image manipulation commands that were implemented by my teammate. It seeks for an in-depth analysis of design alternatives and the implementation of image editing libraries. As my teammate and I had to use two different third-party libraries which return different objects, we had to ensure that the classes in our code (e.g.
CurrentEdit) have helper methods that accept both objects from the two different libraries. -
Credits: The processing of images is facilitated by an external API
scrimage
-
-
Major enhancement: I added the ability to save and set preset commands for faster image-editing
-
What it does: This feature allows the user to save and set a list of image-editing commands in advance of their uses. The
savepresetcommand saves a list of commands that were applied to an image so that they can be applied to other images in the future by executing thesetpresetcommand. -
Justification: This feature improves the product significantly because multiple image filters and manipulations are frequently applied simultaneously. With this feature, users can save multiple image-editing commands as one preset command and use them for other images. This makes image-editing more efficient as the user can now apply multiple image filters or manipulations on other images with just a command instead of executing the commands one by one.
-
Highlights: This feature requires an in-depth understanding of how the image-editing commands (e.g. image filters and image manipulations) are executed as it has to execute a few of them at a go. Furthermore, as a preset list of commands might not work on another image (e.g. the cropping command depends on the size of the image), it is necessary to display the exact command in the preset list of commands that cannot be applied on the image to guide the user.
-
-
Code contributed:
-
Other contributions:
-
Project management:
-
Managed release
v1.4(1 release) on GitHub -
Ensured the standardization of codes in our team to achieve better code quality.
-
-
Documentation:
-
Enhancements to Existing Features:
-
Community:
-
Tools:
-
Contributions to the User Guide
Given below are sections I contributed to the User Guide. They showcase my ability to write documentation targeting end-users. |
Contrast: contrast
Adjusts the contrast of the opened image based on a decimal value. If the contrast value is not specified, a preset decimal value of 1.1 will be used. Any positive decimal value that is lower than 1 (e.g. 0.5) will reduce the contrast of the image while any decimal value that is above 1 (e.g. 1.9) will increase the contrast of the image. Negative decimal value will not be accepted.
Format: contrast [CONTRAST_VALUE]
Examples:
-
contrast(contrast decimal value is preset to 1.1 which increases the contrast slightly) -
contrast 1.4(increases contrast) -
contrast 0.3(reduces contrast)
Brightness: brightness
Adjusts the brightness of the opened image based on a decimal value. If the brightness value is not specified, a preset decimal value of 1.1 will be used. Any positive decimal value that is less than 1 (e.g. 0.5) will reduce the brightness of the image while any decimal value that is above 1 (e.g. 1.9) will increase the brightness of the image. Negative decimal value will not be accepted.
Format: brightness [BRIGHTNESS_VALUE]
Examples:
-
brightness(brightness decimal value is preset to 1.1 which increases the brightness slightly) -
brightness 1.9(increases brightness) -
brightness 0.3(reduces brightness)
Save Preset: savepreset
Saves a list of commands that were used to edit the opened image under a specified name so that you can apply them on other images in the future. The specified name given must not be used before.
Format: savepreset PRESETNAME
Example:
-
rotate 180
brightness 1.3
savepreset preset1(savesrotate 180andbrightness 1.3in a list of commands that can be used on other images)
Set Preset: setpreset
Applies the list of commands saved under the specified preset name on the opened image.
Format: setpreset PRESETNAME
Example:
-
rotate 180
brightness 1.3
savepreset preset1(savesrotate 180andbrightness 1.3in a list of commands that can be used on other images)
open newImage.jpg(opens a new image to edit on)
setpreset preset1(applies the list of commands which consists ofrotate 180andbrightness 1.3on the newly opened image)
Contributions to the Developer Guide
Given below are sections I contributed to the Developer Guide. They showcase my ability to write technical documentation and the technical depth of my contributions to the project. |
Image Filters
Current Implementation
The filter mechanism is facilitated by scrimage, an external API Library that provides image filters methods for our image editor. The gradle script declares a compile-time dependency on this external API through the coordinates: group: 'com.sksamuel.scrimage', name: 'scrimage-filters_2.12', version: '3.0.0-alpha4'.
The image filters feature is facilitated by CurrentEdit. It uses the following operations:
-
CurrentEdit#tempImageDoNotExist()- ReturnstrueiftempImageinCurrentEditis null.tempImageis null only ifopencommand is never called. -
CurrentEdit#getTempImage- Retrieves the temporary imagetempImagewhich stores the filepath of the temporary image, its history of edits [List<Command>] and its metadata. -
CurrentEdit#updateTempImage- Replaces the temporary image in thetempdirectory with the newly edited image and updates thetempImageinstance in the class. -
CurrentEdit#addCommand- Adds this command to the edit history [List<Command>] intempImagefor theundo/redocommand. -
CurrentEdit#displayTempImage()- Displays the temporary image stored in thetempdirectory.
The filter feature mainly consists of:
-
ContrastCommand: Applies adoublecontrast ratio value on the opened image. Thedoublecontrast ratio value is preset to 1.1 if a specifieddoubleratio value is not given by the user. A value above 1 (e.g 1.3) increases the contrast of the image while a positive value below 1 (e.g 0.5) reduces the contrast of the image. -
BrightnessCommand: Applies adoublebrightness ratio value on the opened image. Thedoublebrightness ratio value is preset to 1.1 if a specifieddoubleratio value is not given by the user. A value above 1 (e.g 1.3) increases the brightness of the image while a positive value below 1 (e.g 0.5) reduces the brightness of the image. -
BlackWhiteCommand: Transforms the opened image to a black and white image given a threshold value. The thresholdintegervalue is preset to 127 if a specified threshold is not given by the user. Pixels on the image lighter than the threshold value will become white and pixels darker than the threshold value will become black.
The following describes the main operations and processes for each command stated above.
Contrast Command
This command calls for an adjustment of contrast on an opened image. After adjusting the contrast, it adds this specific command called by the user to the List<Commands> belonging to the tempImage found in CurrentEdit which saves the editing history of the opened image.
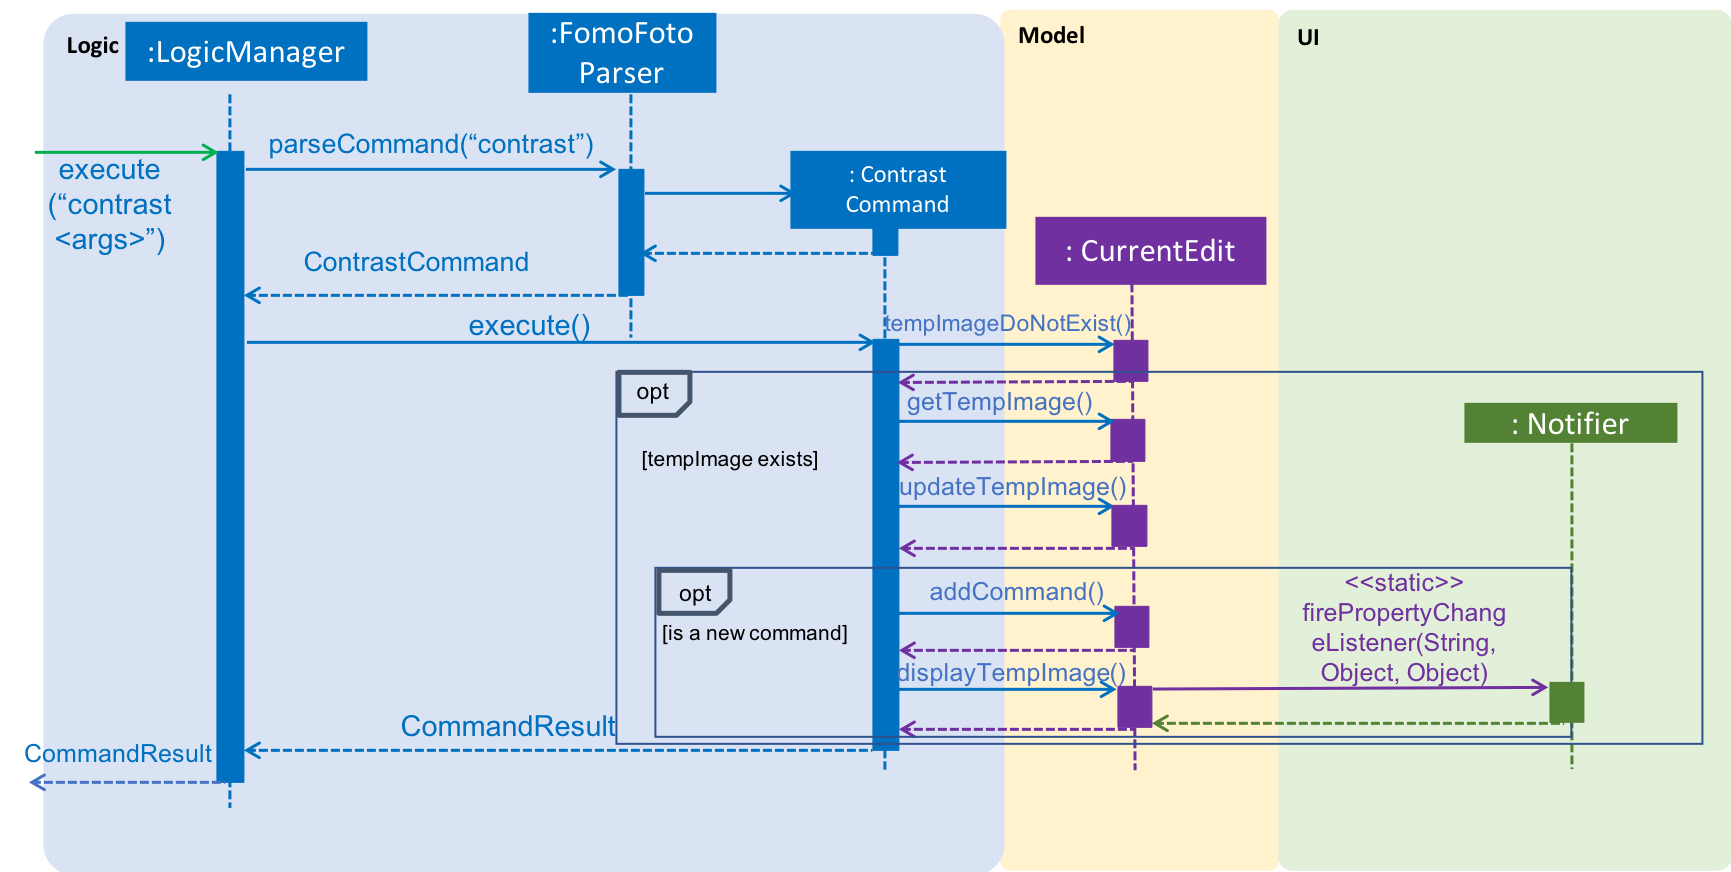
Given below is an example usage scenario of how contrast behaves at each step as shown in Sequence Diagram for Contrast Command. [This applies to the other image filter commands as well.]
Step 1. When the user runs an open command to edit an image, it invokes a method which creates an instance of an Image that stores the file path of the image, its history of edits [List<Command>] and its metadata. This Image object is saved under the variable name tempImage in CurrentEdit for editing.
Step 2. When the user enters the command (e.g. contrast 0.3), the entered command is parsed and the command will be executed.
| If an invalid command is provided, a reminder of how to use the command will be given to the user and no command will be executed. |
Step 3. During execution, the execute method in the ContrastCommand class first invokes CurrentEdit#tempImageDoNotExist to check if an image is opened. If no image is opened, it will throw an error message to inform the user to open an image for editing first. Else, the execute method will invoke CurrentEdit#getTempImage() to get the tempImage from CurrentEdit.
Step 4. Upon retrieving the tempImage, the execute method creates a ContrastFilter instance provided by the external library [scrimage] which takes in a double contrast ratio value. This ContrastFilter will then be applied to the image retrieved from the file path of tempImage.
Step 5. After applying the ContrastFilter on the opened image, CurrentEdit#updateTempImage() is invoked to save the newly edited image and replace the previous one in the file path of the tempImage.
Step 6. The execute method then checks if the boolean isNewCommand is true. If it is true, it indicates that the command is a new contrast command called directly from the user and not through an undo/redo command. This triggers Step 7 in the line below. Otherwise, the command’s execution ends in this step.
Step 7. isNewCommand is set to false to signal that this command is not a new contrast command if it is executed again through the undo/redo command.
Step 8. CurrentEdit#addCommand(this) is invoked to add this command to the List<Command> in tempImage for the undo/redo function and CurrentEdit#displayTempImage() is used to display the edited image on the graphical user interface.
Design Considerations
-
Intermediate images that are still being edited have to be stored in a temporary folder first due to our
undo/redoimplementation.
Brightness Command
This command calls for an adjustment of brightness on an opened image. After adjusting the brightness, it adds this specific command called by the user to the List<Commands> belonging to the tempImage found in currentEdit which saves the editing history of the opened image.
Refer to the example usage scenario, sequence diagram and design considerations in Contrast Command.
BlackWhite Command
This command calls for a transformation of an opened image to a black and white image. After applying the black and white filter, it adds this specific command called by the user to the List<Commands> belonging to the tempImage found in currentEdit which saves the editing history of the opened image.
Refer to the example usage scenario, sequence diagram and design considerations in Contrast Command.
SetPreset Feature
This feature applies a preset list of commands that were saved previously using the setpreset command on the opened image.
Current Implementation
The setpreset function is facilitated by CurrentEdit and TransformationSet. It uses the following operations:
-
CurrentEdit#addCommand(Command)- Adds this command to the edit history [List<Command>] intempImagefor theundo/redocommand. -
CurrentEdit#displayTempImage()- Displays the temporary image stored in the temporary directory. -
CurrentEdit#getTempImage()- Retrieves the temporary imagetempImagewhich stores the filepath of the temporary image, its history of edits [List<Command>] and its metadata. -
CurrentEdit#replaceTempWithOriginal()- Replaces the temporary image in the filepath of thetempImagewith the original image. -
CurrentEdit#tempImageDoNotExist()- ReturnstrueiftempImageinCurrentEditis null.tempImageis null only ifopencommand is never called. -
TransformationSet#findTransformation(String)- Retrieves theList<Command>in thetransformationMapwith the specified preset name. -
TransformationSet#hasWaterMarkCommand(String)- Returns true if theList<Command>contains aWaterMarkCommand. -
TransformationSet#isPresent(String)- Returns true if there is aList<Command>saved under the given preset name.
The following sequence diagram shows how setpreset works:
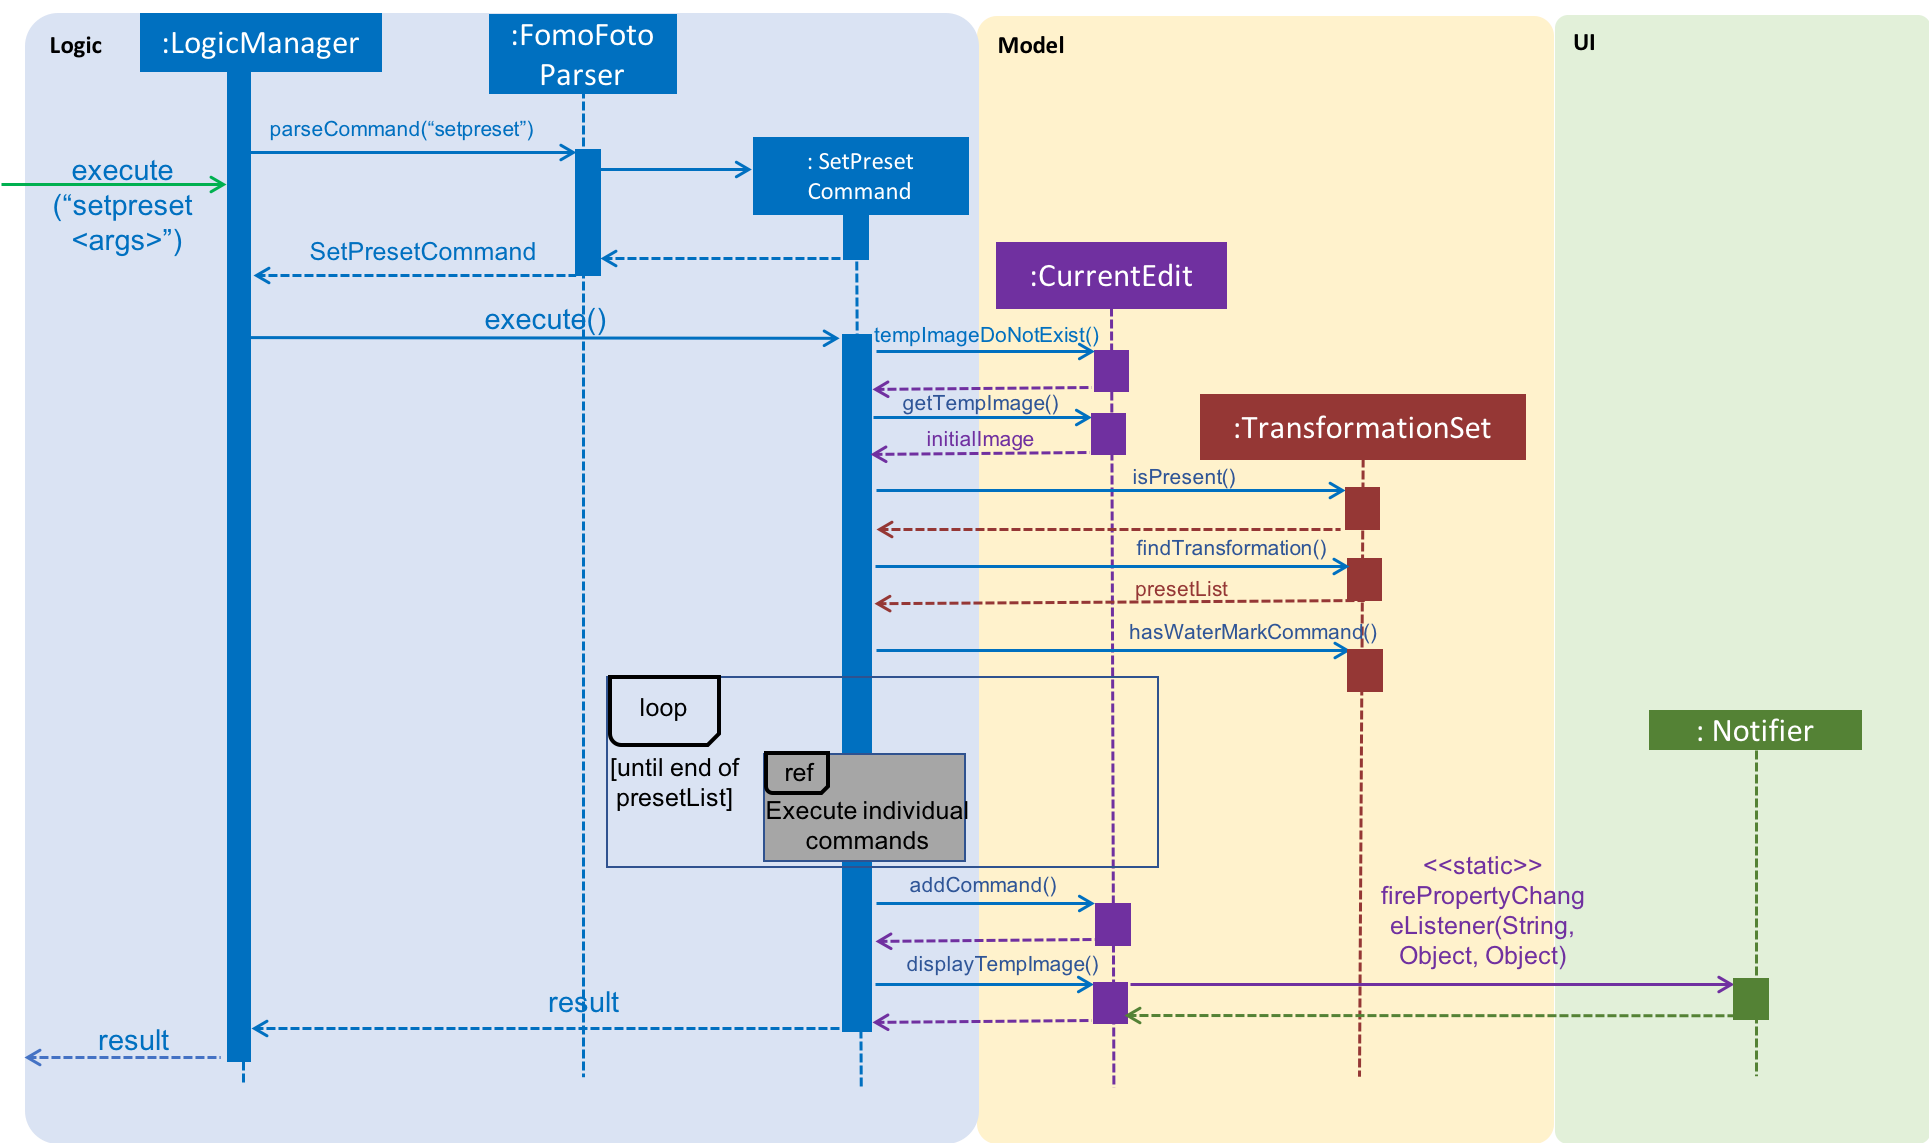
Given below is an example usage scenario of how setpreset behaves at each step as shown in Sequence Diagram for Set Preset Command.
Step 1. When the user enters the command (e.g. setpreset preset1), the entered command is parsed and the command will be executed.
| If an invalid command is provided, a reminder of how to use the command will be given to the user and no command will be executed. |
Step 2. During execution, the execute method in the SetPresetCommand class first invokes CurrentEdit#tempImageDoNotExist to check if an image is opened. If no image is opened, an error message will be displayed to remind the user to open an image for editing first.
Step 3. If an image is opened, the execute method will invoke CurrentEdit#getTempImage() to retrieve the tempImage from CurrentEdit.
Step 4. TransformationSet#isPresent(String) is then invoked to check if there is a preset of commands saved under the name specified by the user. If the method returns false, an error message will be displayed to inform the user that there is no preset of commands saved under the name he/she specified.
Step 5. Else, the method TransformationSet#findTransformation(String) is called to retrieve the List<Command> saved under the specified preset name. TransformationSet#hasWaterMarkCommand(String) is also invoked to check if the List<Command> has a WaterMarkCommand.
Step 6. Commands in the List<Command> will be executed one by one to apply the respective edits to the opened image. If any of the commands throws an exception (e.g. If a watermark is already applied on an image, the execution of a preset of commands which contains a WaterMarkCommand on the same image will throw an error message to indicate that there is already a watermark.), the method CurrentEdit#replaceTempWithOriginal will undo all the changes made to the image.
Step 6. Lastly, CurrentEdit#addCommand(this) is invoked to add this command to the List<Command> in tempImage for the undo/redo function and CurrentEdit#displayTempImage() is used to display the edited image on the graphical user interface.
Design Considerations
-
Alternative 1 (current choice): Allows user to apply the preset of commands on only one image (the image that is opened) at each time.
-
Pros: The user will be able to see the immediate effect of the commands on the image.
-
Cons: The user has to set the preset of commands on different images one by one which takes a longer time.
-
-
Alternative 2: Allows user to apply the preset of commands on multiple images.
-
Pros: The user can save time by applying the commands on many images in just one command instead of having to do it one by one.
-
Cons: The effects of the commands on the images are not shown immediately to the user and user will not be able to determine if the preset of commands is suitable for each of the images.
-
In the end, the first alternative is chosen as we want users to see the immediate effect of the commands so that they can make changes or undo the edits if they do not like what they see.